1. Ifihan
Thank you for choosing the ieGeek S1 Solar Panel Integrated Security Camera. This manual provides essential information for the safe and efficient use of your device. This camera features a 2K (3MP) resolution, integrated solar panel for continuous power, PIR human detection, two-way audio, and is Alexa compatible. Its IP65 waterproof design ensures reliable outdoor performance.
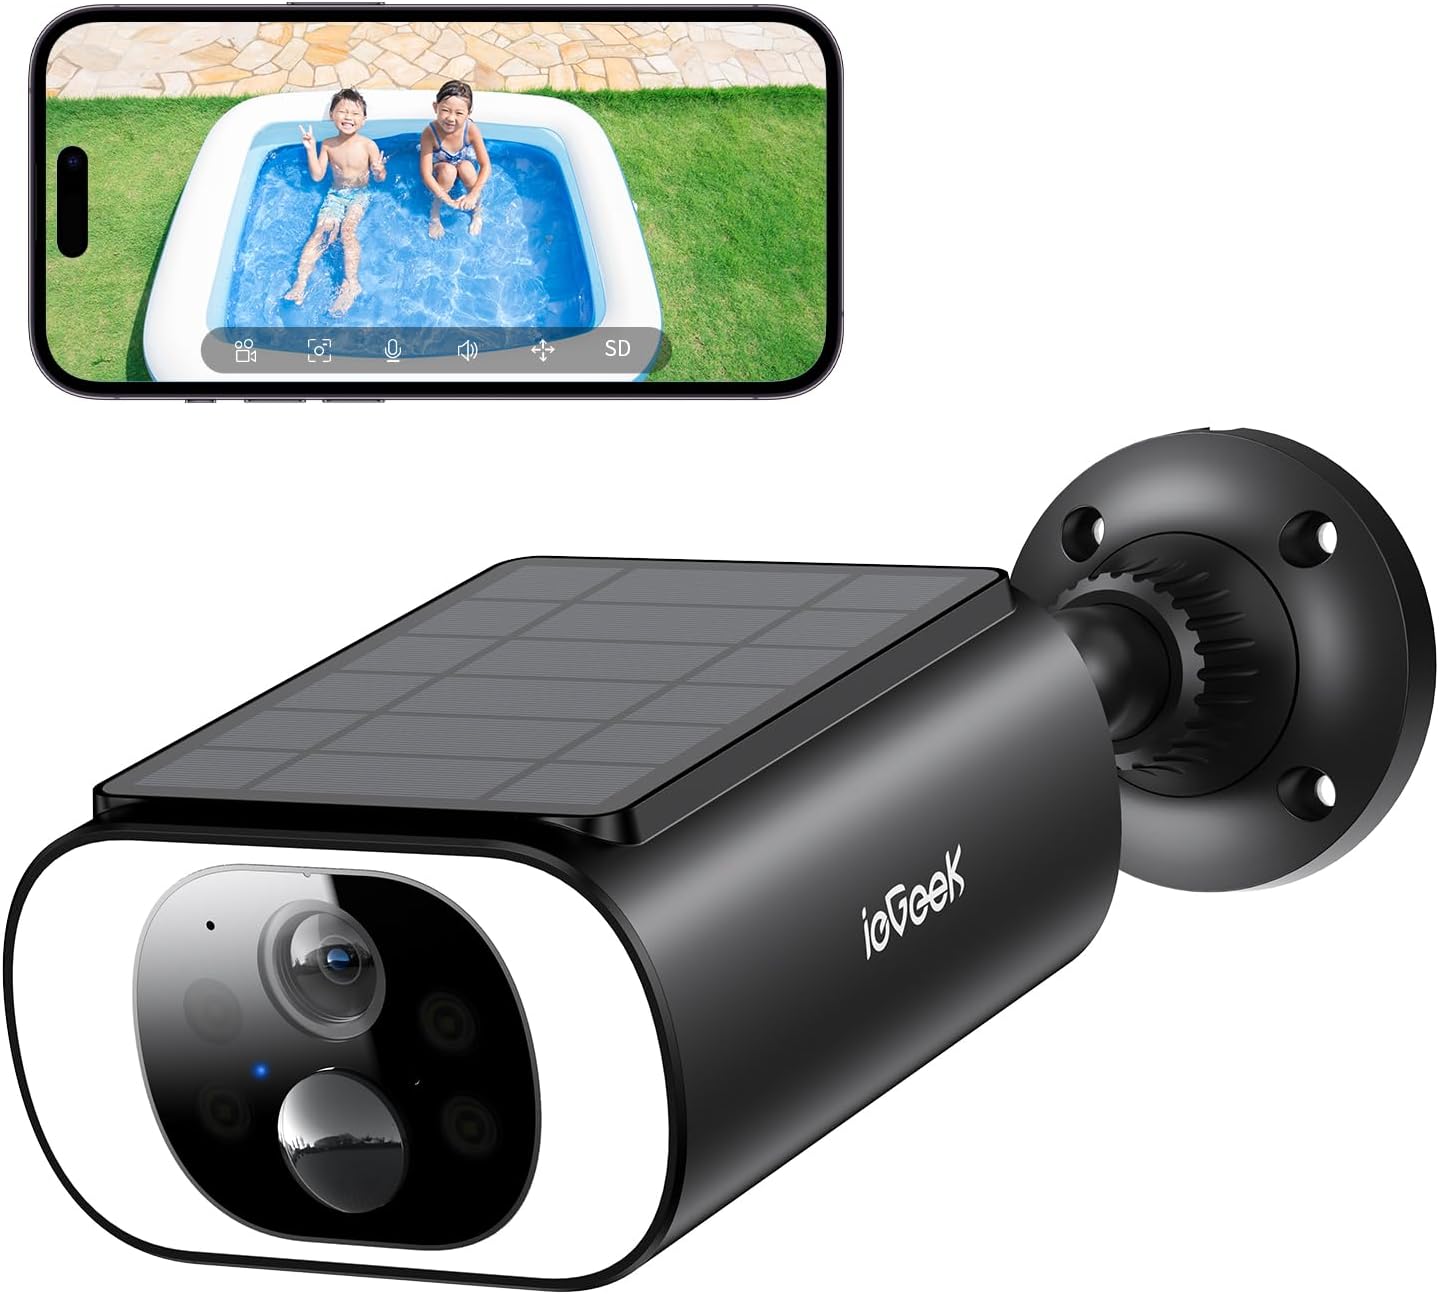
Image 1.1: ieGeek S1 Solar Panel Integrated Security Camera with a smartphone displaying its live feed.
2. Package Awọn akoonu
Jọwọ rii daju pe gbogbo awọn nkan ti a ṣe akojọ rẹ si isalẹ wa ninu package rẹ:
- ieGeek S1 Battery Security Camera x1
- Power Cable (USB) x1
- Skru ati ìdákọró x4
- Ilana itọnisọna x1
- Sitika ipo ipo x1

Image 2.1: All components included in the ieGeek S1 package.

Aworan 2.2: alaye view ti awọn ẹya ẹrọ ti a fi kun.
3. Eto
3.1 Gbigba agbara akọkọ
Before first use, it is recommended to fully charge the security camera for up to 8 hours using a 5V/2A power adapter (not included, USB cable provided).
3.2 Wi-Fi Requirements
The camera supports 2.4GHz Wi-Fi networks only. 5GHz networks are not supported. Ensure your Wi-Fi network is configured for 2.4GHz.
3.3 App Download ati fifi sori
Download the "ieGeek Cam" app from your device's app store (iOS or Android). Register an account and log in.
3.4 Power On and Reset
Open the cap at the bottom of the camera. Press and hold the "power" button to turn on the device. A red light will flash slowly, indicating it's ready for setup. If the red light is not flashing, press and hold the "reset" button for 4-5 seconds until a beep sound is heard and the red light flashes slowly.
3.5 Ṣíṣepọ̀ Kámẹ́rà
Follow the in-app instructions to add your camera. You can connect via Bluetooth or by scanning a QR code displayed on your phone with the camera lens.
Video 3.1: Demonstrates the connection method for ieGeek S2 camera, which is similar to S1 setup.
Video 3.2: Shows the general camera connection procedure using the app.
3.6 Iṣagbesori Kamẹra
Use the provided positioning sticker to mark the drill holes on your desired installation surface. Drill the holes, insert the anchors, and then secure the camera bracket with screws. Attach the camera to the bracket by rotating it clockwise until secure. Ensure the solar panel is positioned to receive maximum sunlight.
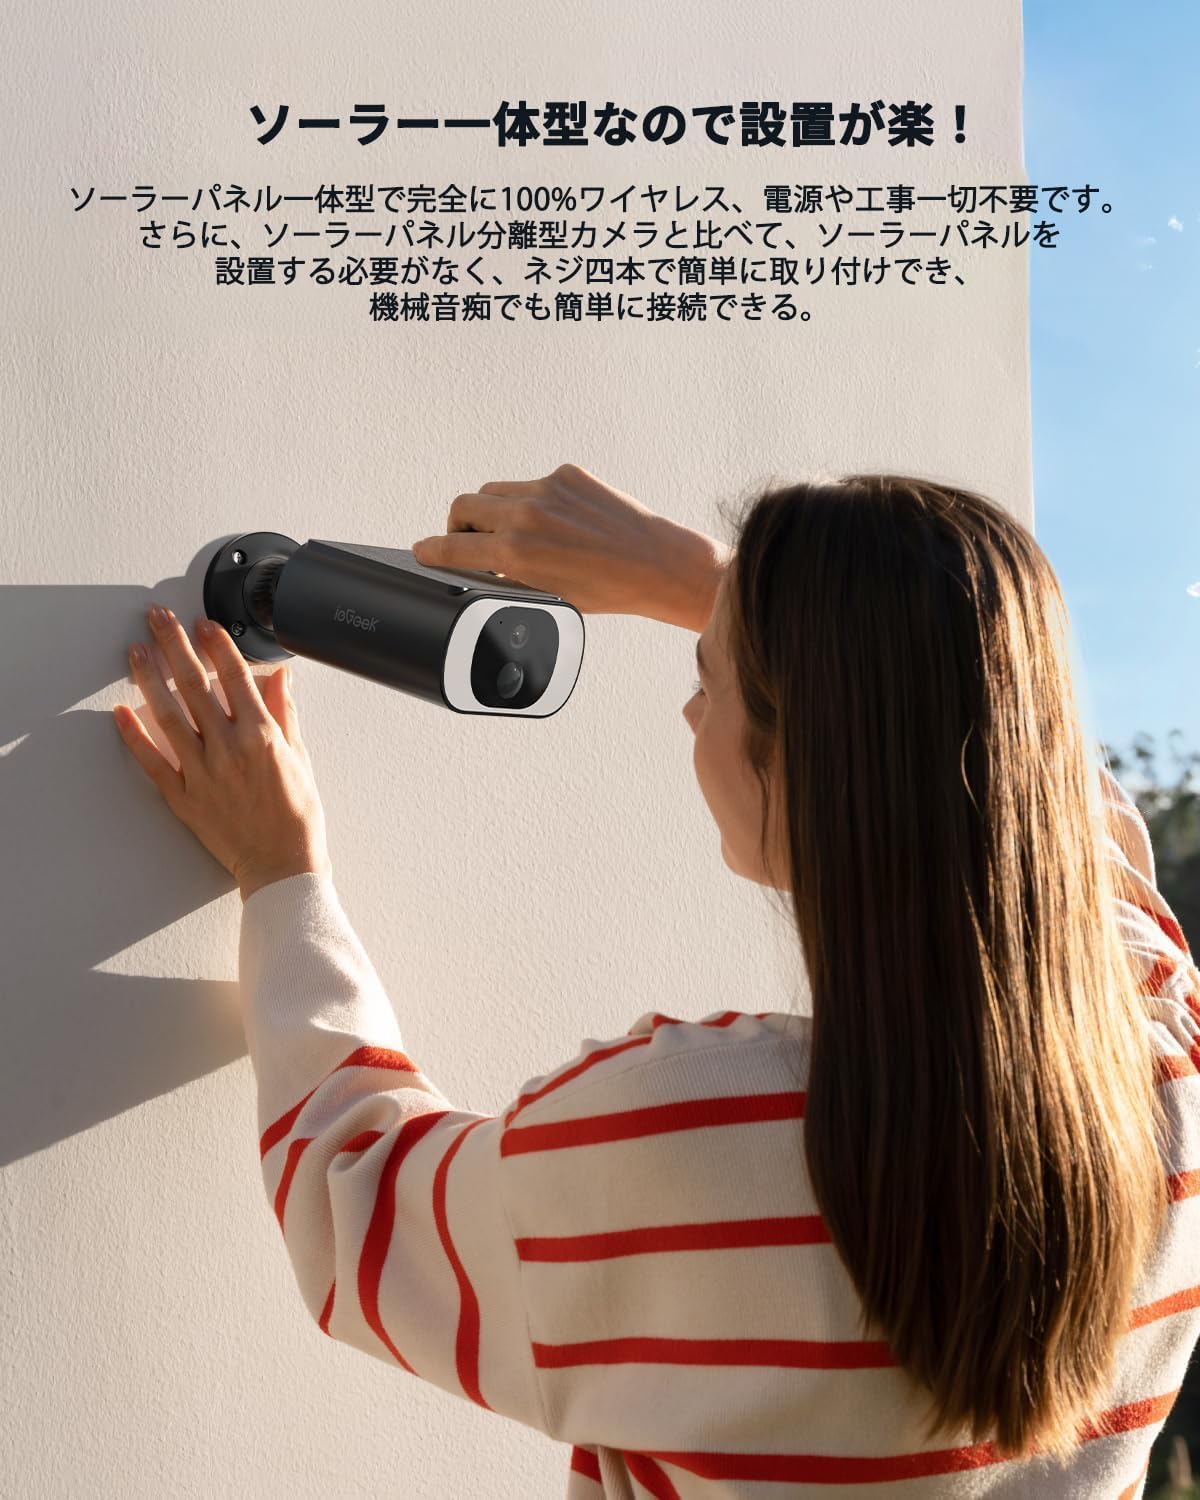
Image 3.1: A person installing the ieGeek S1 camera on a wall, highlighting its easy, wireless setup.
Video 3.3: Demonstrates the installation process for a security camera.
4. Awọn ilana Iṣiṣẹ
4.1 Live View àti Àbójútó Látọ̀ọ́nà
Access the live feed of your camera anytime, anywhere through the ieGeek Cam app. Monitor your property 24/7 and review foo ti o ti gbasilẹtage.

Àwòrán 4.1: Onírúurú views from the camera, illustrating remote monitoring capabilities.
4.2 PIR Human Detection and Alerts
The camera features a PIR sensor that detects human and animal movement. Upon detection, it automatically starts recording to the free cloud storage (6-second recording/7-day auto-overwrite) and sends push notifications with photos to your smartphone. Customize detection areas and sensitivity levels (10 levels) to minimize false alarms.

Image 4.2: Visual representation of PIR human detection in action.

Image 4.3: App interface for setting detection areas and sensitivity.
4.3 Night Vision and Alarm Modes
Equipped with 18 high-brightness LED lights and 4 infrared LED lights, the camera offers enhanced color night vision, providing clear images even in darkness. It supports three night defense modes:
- Light Deterrence Mode: Flashes bright lights upon detection.
- Sound and Light Alarm Mode: Activates sound and light alarms.
- Siren Alarm Mode: Emits a loud siren.
These modes can be customized or turned off via the app.

Image 4.4: The camera's powerful LED lights providing clear night vision.

Image 4.5: Illustration of the three available night defense modes.
4.4 Meji-Ona Audio
The built-in microphone and speaker allow for real-time two-way communication through the app. This is useful for speaking to visitors or deterring intruders.

Image 4.6: Demonstrating the two-way audio feature for communication.
4.5 Ibi ipamọ Aw
The camera supports both local storage via a microSD card (up to 128GB, sold separately) and permanent free cloud storage (6-second recording/7-day auto-overwrite). Video encryption ensures privacy.

Aworan 4.7: Pariview of the two available storage methods for recorded footage.
4.6 Alexa ibamu
The camera is compatible with Alexa voice assistants, allowing you to view the monitoring screen with simple voice commands.

Image 4.8: Demonstrating Alexa integration for hands-free monitoring.
Fidio 4.1: Ipariview of the camera's various functions and features.
5. Itọju
5.1 Solar Ngba agbara
The integrated monocrystalline silicon solar panel has a high conversion rate of 19.5% and a black coating for excellent heat absorption, allowing the camera to operate year-round without interruption. Ensure the solar panel is clean and free from obstructions for optimal charging.
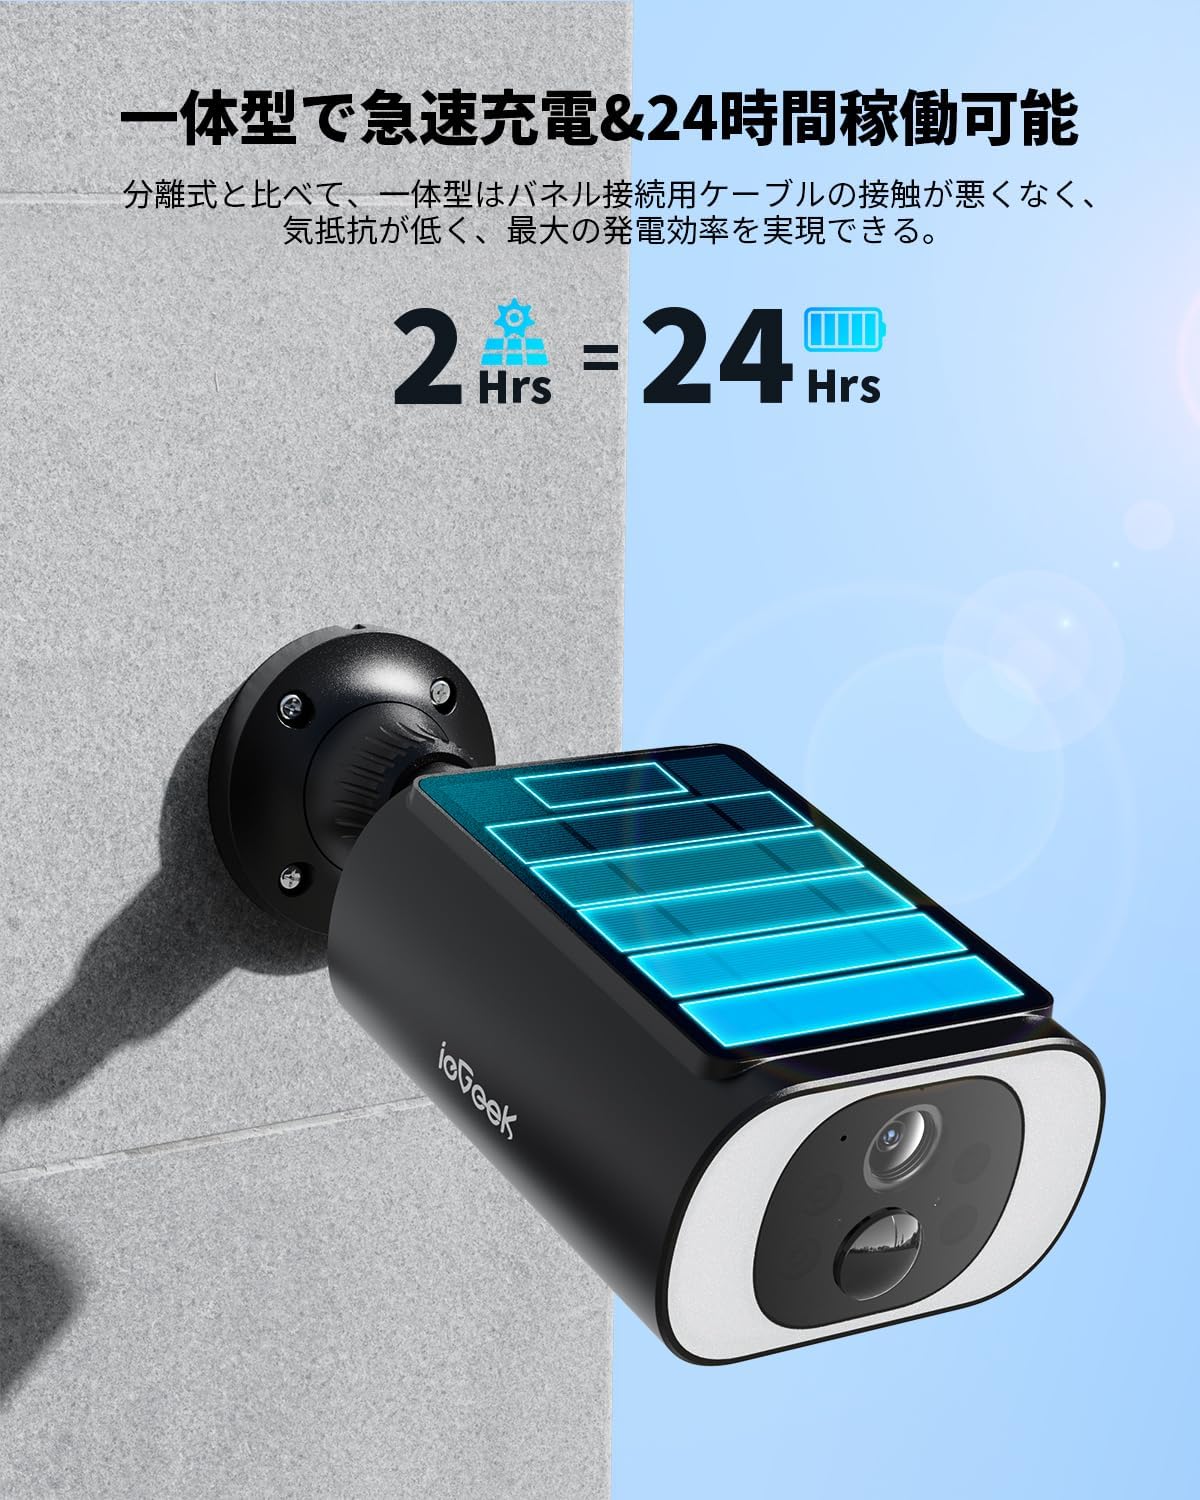
Image 5.1: The camera's solar charging capability, providing continuous power.
5.2 Oju ojo Resistance
With an IP65 waterproof rating and a fully sealed USB port, the camera is designed for long-term outdoor use in various weather conditions, including rain, snow, and typhoons.

Image 5.2: The camera's robust IP65 waterproof design.
6. Laasigbotitusita
If you encounter any issues with your ieGeek S1 camera, please refer to the following common troubleshooting steps:
- Ko si Agbara: Ensure the camera is fully charged. Check the power button and reset the device if necessary.
- Awọn ọran Isopọ Wi-Fi: Verify your Wi-Fi is 2.4GHz. Ensure the camera is within range of your router. Try resetting the camera and re-pairing.
- Awọn itaniji eke: Adjust the PIR detection sensitivity and customize the detection area in the app.
- Didara Aworan Ko dara: Ensure the lens is clean and free from obstructions. Check your Wi-Fi signal strength.
- Ko si Gbigbasilẹ: Check if a microSD card is inserted correctly or if cloud storage is active. Ensure motion detection is enabled.
For further assistance, please contact ieGeek customer support.
7. Awọn pato
| Ẹya ara ẹrọ | Sipesifikesonu |
|---|---|
| Awoṣe ọja | S1 |
| Ipinnu Yaworan fidio | 1296p (2K 3MP) |
| Asopọmọra Technology | Alailowaya (Wi-Fi 2.4GHz) |
| Pataki Awọn ẹya ara ẹrọ | Two-Way Audio, PIR Human Detection, Night Color Recording, Alexa Compatibility |
| inu ile / ita gbangba Lo | Ita gbangba |
| Iṣagbesori Iru | Ògiri Ògiri |
| Awọn iwọn Ọja (LxWxH) | 10 x 10 x 10 mm |
| Iwọn Ọja | 540 g |
| Batiri To wa | Bẹẹni |
8. Atilẹyin ọja ati Support
ieGeek offers a 1-year warranty for this product. Additionally, a special 1-year extended protection plan is available, providing a maximum of 2 years of coverage. For any inquiries or support, please contact our official email. We aim to respond within 12 hours on weekdays, ensuring your rights are protected.


