1. Ọja Ipariview
This manual provides instructions for the installation and maintenance of the YITAMOTOR Fender Flares Kit. These fender flares are designed to provide additional tire coverage and protection for your vehicle's wheel wells.
The fender flares are constructed from high-quality polypropylene (PP) material, engineered for durability and resistance to deformation, shrinkage, and cracking, even in various climates. They feature a smooth black finish and are UV-resistant. The flares can also be painted to match your vehicle's color preferences.

Image: Four individual YITAMOTOR fender flares, showcasing ọja apẹrẹ.
2. Package Awọn akoonu
Daju pe gbogbo awọn paati wa ṣaaju ki o to bẹrẹ fifi sori:
- 1 x Fender Flares Kit (4 pieces: 2 front, 2 rear)
- 1 x Set of Mounting Hardware (including 304 stainless steel screws)
- 1 x Ilana itọnisọna (iwe yii)
3. Awọn alaye ọja
| Iwa | Ẹ̀kúnrẹ́rẹ́ |
|---|---|
| Brand | YATAMOTOR |
| Nọmba awoṣe | MAYIM2msJi |
| Ohun elo | Polypropylene (PP) |
| Ipari ode | Black dan |
| Àwọ̀ | Black (Paintable) |
| Iwọn Nkan | 16.54 iwon |
| Awọn iwọn Ọja (L x W x H) | 49.21 x 11.02 x 31.69 inches |
| Fit Iru | Ti nše ọkọ Specific Fit |
| Ọkọ Iṣẹ Iru | 2019-2024 Chevy Silverado 1500 (Excl. 2019 LD) |
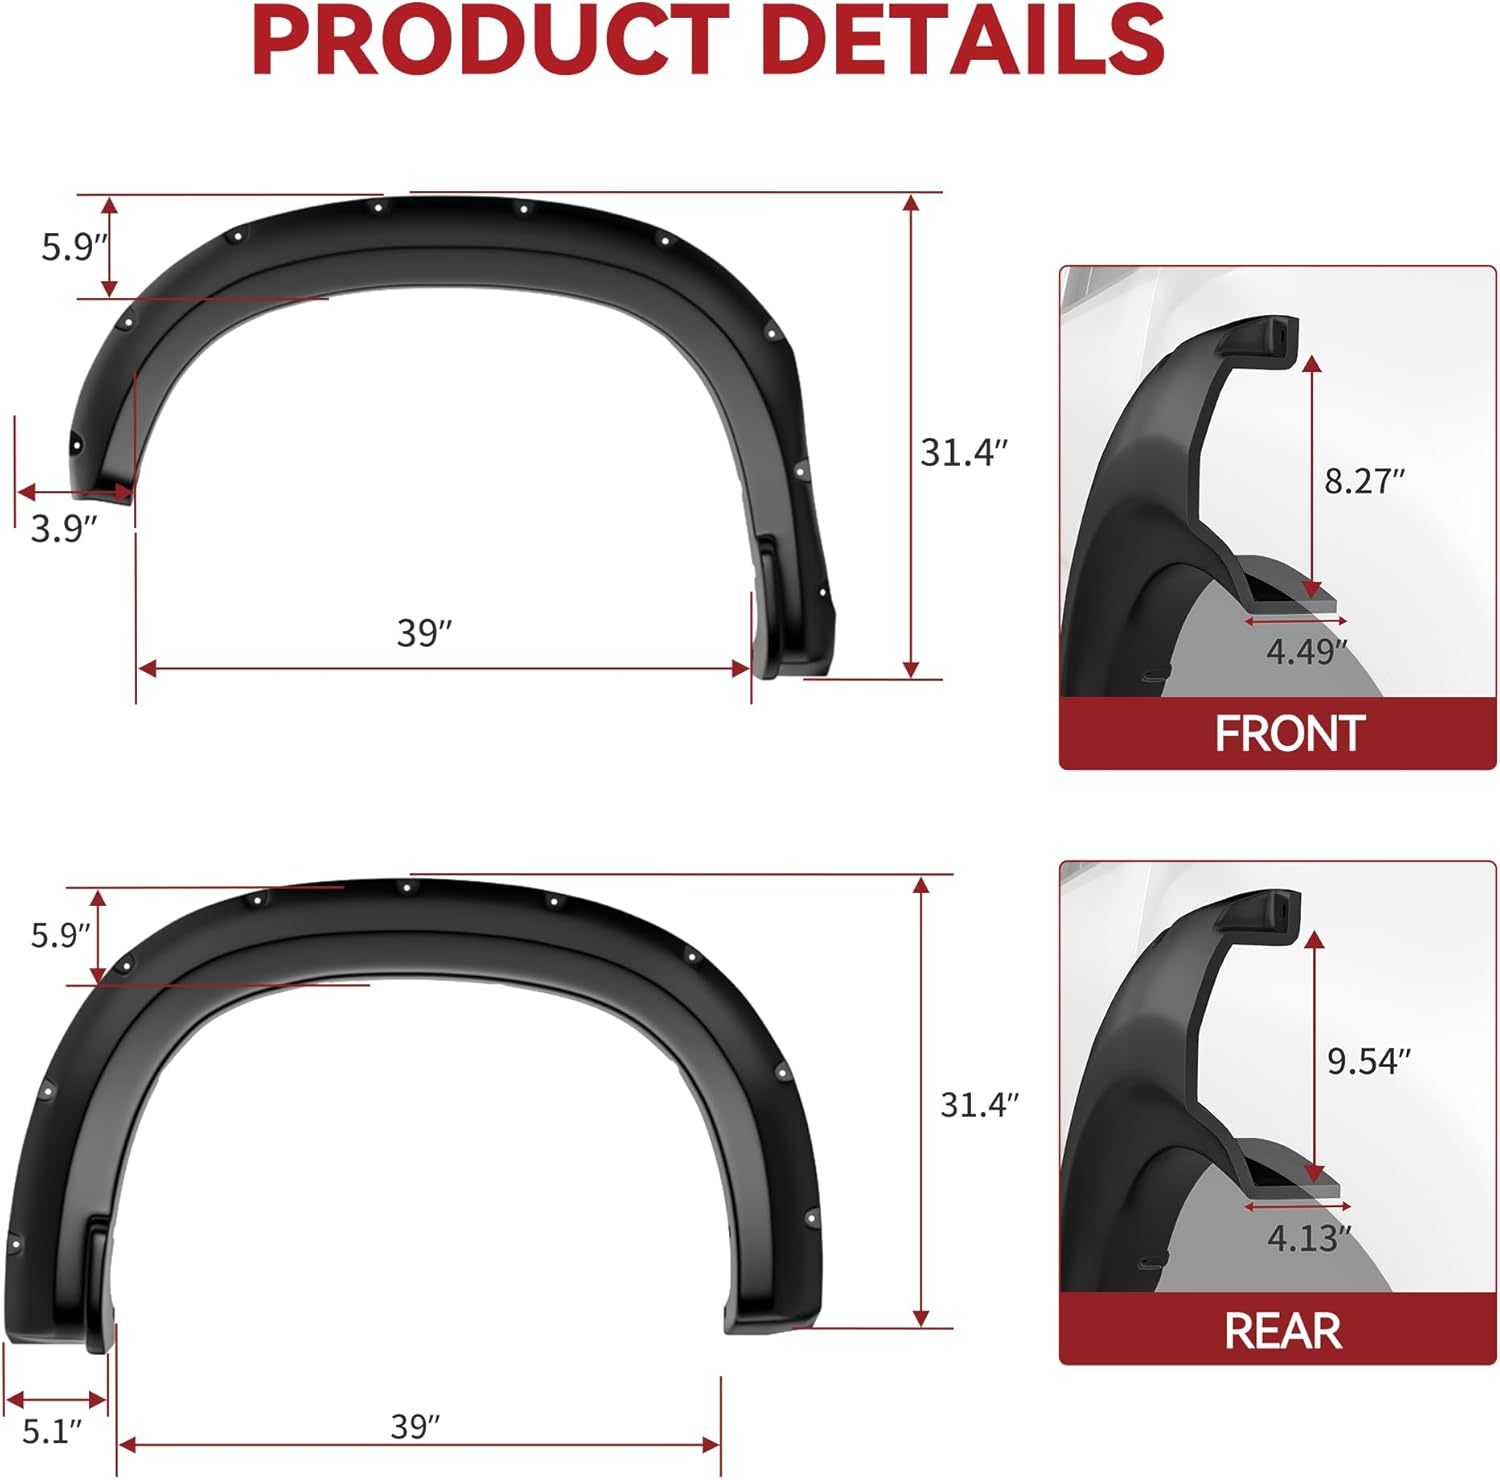
Image: Technical drawing illustrating the dimensions of the front and rear fender flares.
4. Itọsọna fifi sori ẹrọ
Follow these steps for proper installation of your YITAMOTOR Fender Flares. No cutting is required for installation.
4.1. Pre-Fifi sori
- Ṣayẹwo Awọn ohun elo: Unpack the fender flares and mounting hardware. Verify all parts are present and undamaged.
- Clean Vehicle Surface: Thoroughly clean the area around the wheel wells where the fender flares will be installed. Ensure surfaces are free of dirt, debris, and wax.
- Idanwo Ibamu: Temporarily hold each fender flare against its corresponding wheel well to ensure proper alignment and fitment before permanent installation.

Image: A person bending a fender flare to show its flexible material, aiding in installation.
4.2. Mounting Process
- Sopọ ati Ni aabo: Position the fender flare onto the wheel well. The flares are designed with pre-drilled slots and holes that align with existing mounting points on your vehicle.
- Fi Hardware sori ẹrọ: Use the provided 304 stainless steel screws and other mounting hardware to secure the fender flares. Ensure all bolts are tightened securely but do not overtighten to avoid damaging the flares or vehicle.
- Repeat for All Flares: Follow the same procedure for installing the remaining three fender flares.

Image: A hand indicating the precise fitment of a fender flare on a truck's wheel well.

Aworan: A sunmọ-soke view of a bolt head securing the fender flare, highlighting the bolt-riveted design.
4.3. Fi sori ẹrọ lẹhin
After installation, double-check all mounting points to ensure the flares are securely attached and there are no loose components.

Image: A truck with YITAMOTOR fender flares installed, illustrating the 'no cutting installation' and the smooth black finish.
5. Lilo ati Awọn ẹya ara ẹrọ
The YITAMOTOR Fender Flares are designed to enhance your vehicle's appearance and provide practical benefits:
- Idaabobo Kanga Kẹkẹ: Shields your wheel wells from mud, scratches, and other road debris, especially during off-road driving.
- Ikole ti o tọ: Made from high-impact thermoplastic, resistant to extreme weather conditions, ensuring long-lasting performance.
- Paintable Surface: The smooth black coating allows for custom painting to match or complement your vehicle's color.

Image: A side-by-side comparison showing a truck's wheel well before and after fender flare installation, demonstrating protection from rust and damage.

Image: A fender flare being painted blue, illustrating the product's paintable surface for customization.
6. Itọju
To maintain the appearance and longevity of your fender flares:
- Ninu igbagbogbo: Wash the fender flares regularly with mild soap and water to remove dirt, mud, and road grime.
- Yago fun Kemikali lile: Do not use abrasive cleaners or harsh chemicals that could damage the finish or material.
- Ayewo Lokọọkan: Periodically check the mounting hardware for tightness and ensure the flares remain securely attached.

Image: A person cleaning a fender flare on a truck with a pressure washer, demonstrating routine maintenance.
7. Laasigbotitusita
Ti o ba pade eyikeyi awọn ọran lakoko tabi lẹhin fifi sori ẹrọ, ronu atẹle naa:
- Ibamu Alailowaya: Ensure all mounting hardware is correctly installed and tightened. Re-check alignment.
- Awọn ẹya ti o padanu: Refer to the 'Package Contents' section. If parts are missing, contact YITAMOTOR customer support.
- Awọn ọran Imudara: Double-check your vehicle's year, make, and model against the product's compatibility information.
8. Atilẹyin ọja ati Support
For warranty information or technical assistance, please refer to the official YITAMOTOR webojula tabi kan si wọn onibara iṣẹ taara. Tọju iwe-ẹri rira rẹ bi ẹri rira.