Ọrọ Iṣaaju
This manual provides detailed instructions for the GLEDOPTO ZigBee 3.0 LED Controller Pro Plus, model GL-C-205P. This device is designed to control various LED strip lights, including RGBCCT, RGBW, and RGB types, within a ZigBee 3.0 smart home ecosystem. It offers flexible voltage support and multiple control options for enhanced lighting management.
Alaye Aabo
- Rii daju pe ipese agbara voltage baamu vol titẹ sii ti oludaritage ibiti (DC 12-48V).
- Do not exceed the maximum output current of 15A.
- Ge asopọ agbara ṣaaju fifi sori ẹrọ tabi itọju lati ṣe idiwọ mọnamọna.
- Install the controller in a dry environment, away from moisture and extreme temperatures.
- Jeki kuro ni arọwọto awọn ọmọde.
- Consult a qualified electrician if you are unsure about any wiring procedures.
Package Awọn akoonu
- 1x GLEDOPTO ZigBee Pro+ LED Strip Controller (Model GL-C-205P)
Awọn pato

Image: Detailed product parameters for the GLEDOPTO GL-C-205P LED Controller, including dimensions, voltage, current, and communication protocols.
| Paramita | Iye |
|---|---|
| Nọmba awoṣe | GL-C-205P |
| Iṣagbewọle Voltage | DC 12-48V |
| Ijade lọwọlọwọ/ikanni | Iye ti o ga julọ ti 12A |
| Lapapọ Ijade lọwọlọwọ | Iye ti o ga julọ ti 15A |
| Ilana ibaraẹnisọrọ | ZigBee + 2.4G RF |
| Irú Waya tí a dámọ̀ràn | 0.3-2mm² (22-14AWG) |
| Ipari ipari | 10mm |
| Ohun elo | PC aabo ina |
| Àwọ̀n Àwọ̀n (NW) | 53.7g |
| Àdánù Àdánù (GW) | 64.2g |
| Awọn iwọn otutu ti nṣiṣẹ | -20 to +45°C |
| Iwọn | 108x45x18mm |
Ọja Awọn ẹya ara ẹrọ
- ZigBee 3.0 High-Speed Protocol: Compatible with various standard ZigBee gateways such as Philips Hue, Conbee, Amazon Echo Studio, and Homey. Enables control via apps or voice commands.
- 3-in-1 Modes: Supports RGBCCT, RGBW, and RGB LED strip connections. Different indicator light colors correspond to the active function.
- Jakejado Voltage Ibiti: Operates with DC 12-48V, allowing compatibility with a broader range of LED strips and other low-voltage lighting products, provided voltage and current match.
- Àwọn Ètò Ipò Agbára-ṣíṣe: Configure the controller to remember its last state or turn on to a default setting after a power interruption.
- Igbohunsafẹfẹ Yiyan: Adjustable PWM frequency (600Hz, 800Hz, 1000Hz, 2000Hz, 4000Hz, 8000Hz) to match different power supplies and reduce noise. Default frequency is 1000Hz.
Eto ati fifi sori
1. Fifi okun waya si oludari naa

Image: Illustration of the quick connect port design, showing how to open the connector, insert wires, and secure them.
- Mura Awọn okun waya: Strip approximately 10mm of insulation from the ends of your LED strip wires and power supply wires. Ensure the wire gauge is between 0.3-2mm² (22-14AWG).
- Ṣii Asopọmọra: Gently open the quick connect port by pushing the lever upwards.
- Fi awọn Waya sii: Insert the prepared wires into the corresponding terminals. Pay close attention to polarity (+/-) for the input power and the correct color channels (R, G, B, W, CCT) for the output to the LED strip.
- Awọn okun to ni aabo: Press the lever down to secure the wires firmly in place. Ensure good contact between the wire and the terminal.
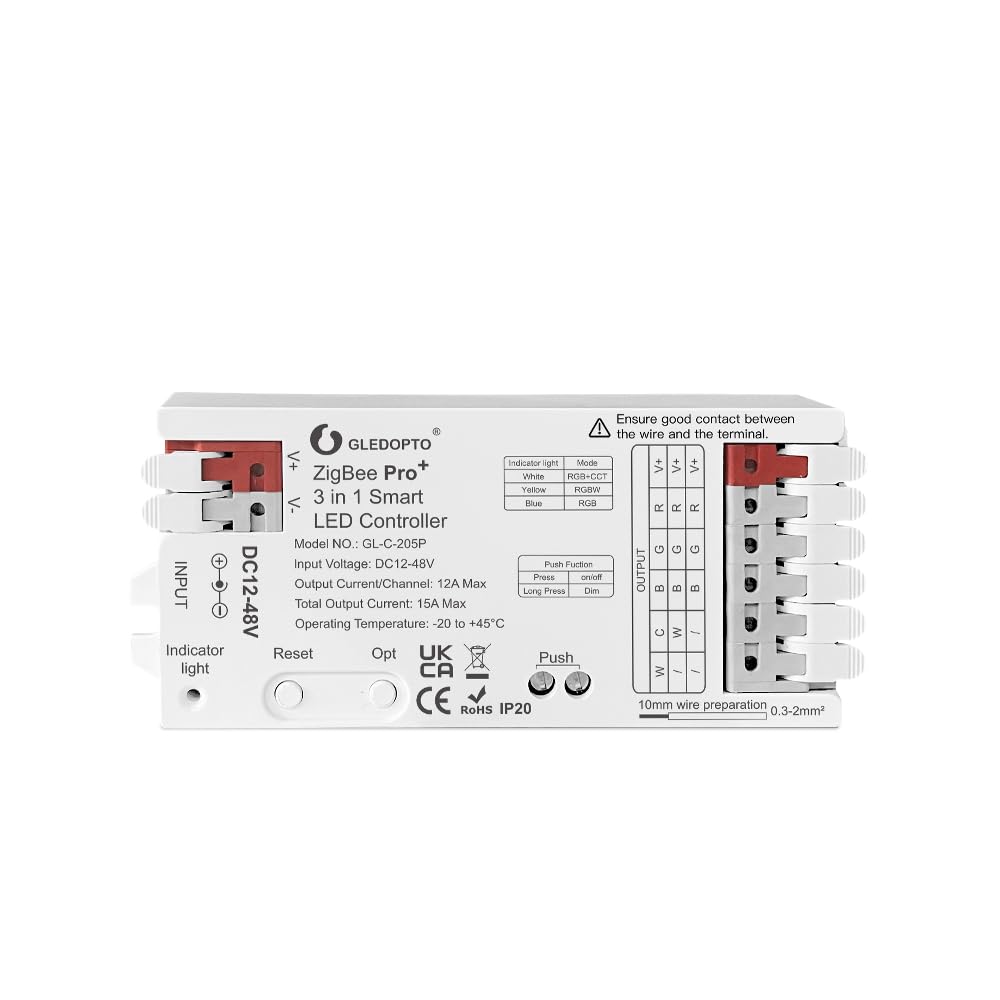
Aworan: Oke-isalẹ view of the GLEDOPTO GL-C-205P LED Controller, showing the DC 12-48V input terminals on the left and the multi-channel output terminals on the right for LED strips.
2. Connecting to a ZigBee Hub
The GLEDOPTO GL-C-205P controller uses ZigBee 3.0 protocol for smart home integration. To connect it to your smart home system:
- Agbara Tan: Connect the controller to a compatible DC 12-48V power supply. The indicator light will illuminate.
- Bẹ̀rẹ̀ Ipò Ìsopọ̀pọ̀: Refer to your ZigBee hub's instructions for initiating device pairing mode.
- Reset Controller (if needed): If the controller does not automatically enter pairing mode, you may need to reset it. Long press the 'Reset' button for 5 seconds until the indicator light flashes.
- Jẹrisi Asopọmọra: Once successfully paired, the controller will appear in your ZigBee hub's device list, and the indicator light may change or stop flashing according to the hub's feedback.
Note: Tuya Zigbee hubs currently block third-party devices. GLEDOPTO ZigBee products are unable to connect to Tuya hubs. Please consider this compatibility before purchase if using a Tuya system.
Awọn ilana Iṣiṣẹ
1. Understanding 3-in-1 Modes

Image: The GLEDOPTO GL-C-205P controller highlighting its 3-in-1 functionality (RGBCCT, RGBW, RGB) and quick wire connectors.
The controller supports three main LED strip configurations:
- RGBCCT: Red, Green, Blue, Cool White, Warm White channels.
- RGBW: Red, Green, Blue, White channels.
- RGB: Red, Green, Blue channels.
The indicator light on the controller will show different colors corresponding to the selected function:
- Funfun: RGBCCT mode
- Yellow: Ipo RGBW
- Buluu: Ipo RGB
2. Awọn iṣẹ bọtini
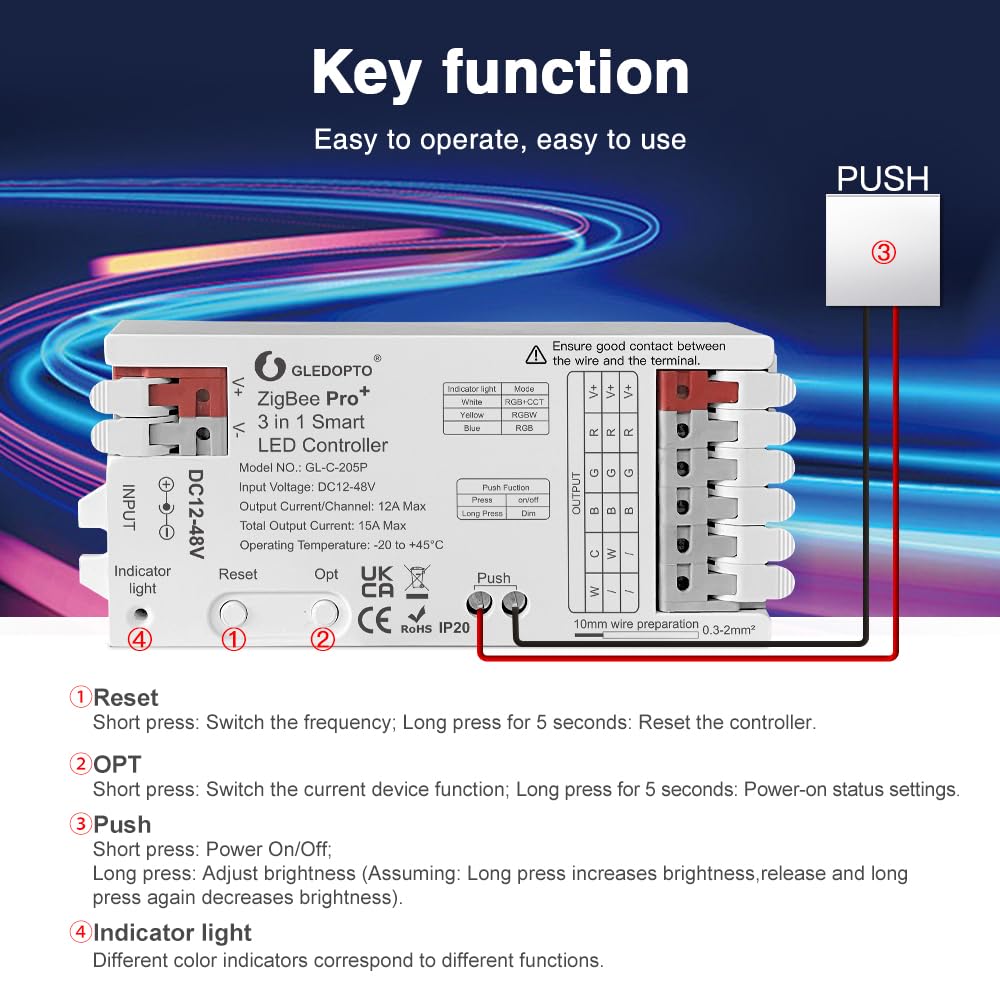
Image: Diagram illustrating the functions of the Reset, OPT, and Push buttons on the GLEDOPTO GL-C-205P LED Controller, along with the indicator light.
- Bọtini atunto:
- Short press: Switches the frequency.
- Long press (5 seconds): Resets the controller to factory settings.
- OPT Button:
- Short press: Switches the current device function (RGBCCT/RGBW/RGB).
- Long press (5 seconds): Enters power-on status settings mode.
- Bọtini Titari:
- Short press: Powers the LED strip On/Off.
- Long press: Adjusts brightness. (Assuming: Long press increases brightness, release and long press again decreases brightness).
- Imọlẹ Atọka: Displays different colors corresponding to the active function mode.
3. Agbara-lori Ipo Eto
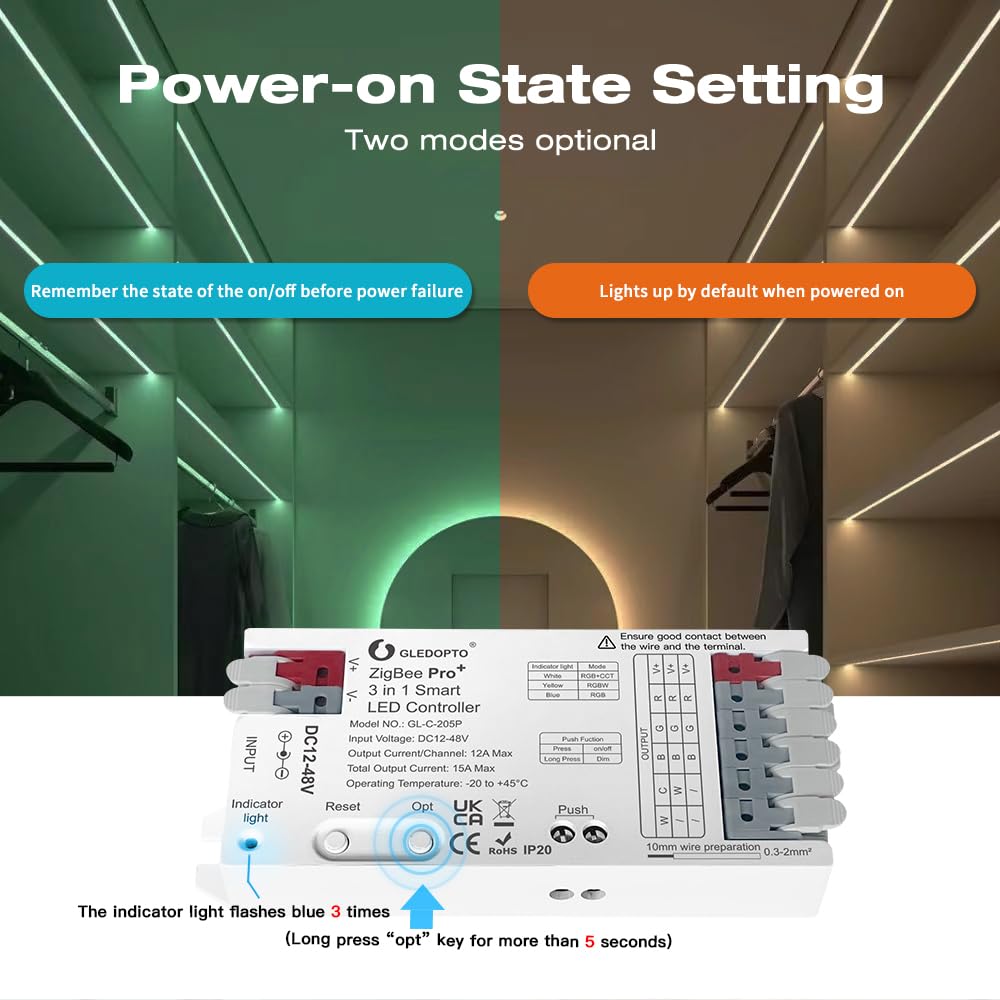
Image: The GLEDOPTO GL-C-205P controller demonstrating two power-on state options: remembering the last state or lighting up by default when powered on.
To configure the power-on behavior:
- Long press the 'OPT' button for more than 5 seconds.
- Ìmọ́lẹ̀ àmì náà yóò máa tàn ní àwọ̀ búlúù fẹ́ẹ́rẹ́fẹ́.
- Release the button. The indicator will turn off for 4 seconds, then resume its previous color, indicating the power-on status setting is complete. This toggles between remembering the last state and turning on to a default state.
4. Igbohunsafẹfẹ Eto
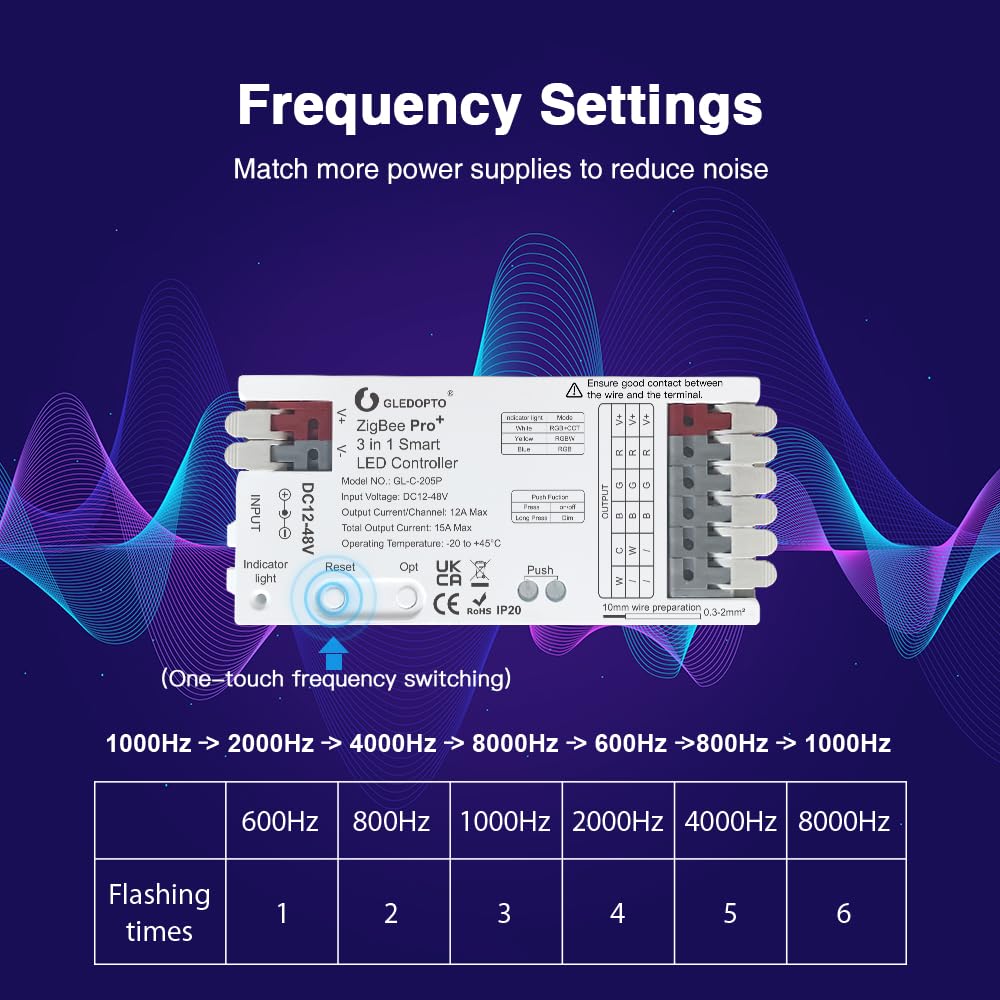
Image: The GLEDOPTO GL-C-205P controller with a table showing selectable PWM frequencies (600Hz to 8000Hz) and their corresponding indicator light flash times.
The controller's PWM frequency can be adjusted to optimize compatibility with different power supplies and minimize noise. The default frequency is 1000Hz.
To change the frequency, short press the 'Reset' button. The indicator light will flash a certain number of times to indicate the selected frequency:
| Filasi | Igbohunsafẹfẹ |
|---|---|
| 1 | 600Hz |
| 2 | 800Hz |
| 3 | 1000Hz (aiyipada) |
| 4 | 2000Hz |
| 5 | 4000Hz |
| 6 | 8000Hz |
5. App Iṣakoso

Image: A smartphone screen displaying a color wheel interface for controlling LED strip colors, with a room illuminated by various colored lights in the background.
Once connected to a compatible ZigBee hub, the GLEDOPTO controller can be managed through the hub's dedicated smartphone application. This allows for:
- Color selection from a palette of 16 million colors.
- Atunṣe imọlẹ.
- Color temperature control (for RGBCCT/RGBW strips).
- Setting up scenes and schedules.
- Voice control integration with compatible assistants (e.g., Alexa).
Itoju
- Jeki oludari ni mimọ ati ofe kuro ninu eruku. Lo asọ ti o gbẹ, asọ fun mimọ.
- Yago fun ṣiṣafihan ẹrọ naa si imọlẹ orun taara, ọriniinitutu giga, tabi awọn iwọn otutu to gaju.
- Rii daju pe fentilesonu to dara ni ayika oludari lati ṣe idiwọ igbona.
- Regularly check wire connections to ensure they remain secure.
Laasigbotitusita
- Alakoso ko dahun: Check power connections. Ensure the power supply is within the DC 12-48V range and providing sufficient current.
- Unable to pair with ZigBee hub:
- Ensure your hub is in pairing mode.
- Try resetting the controller by long-pressing the 'Reset' button for 5 seconds.
- Verify compatibility: GLEDOPTO ZigBee products are not compatible with Tuya Zigbee hubs.
- Ensure the controller is within range of your ZigBee network.
- LED strip not lighting up or incorrect colors:
- Check all wiring connections for correct polarity and secure contact.
- Verify that the correct 3-in-1 mode (RGBCCT/RGBW/RGB) is selected for your LED strip type using the 'OPT' button.
- Rii daju pe okun LED funrararẹ ṣiṣẹ.
- Ìró tàbí ìró: Try adjusting the PWM frequency using a short press of the 'Reset' button to find the optimal setting for your power supply.
Atilẹyin ọja ati Support
For warranty information and technical support, please refer to the official GLEDOPTO webojula tabi kan si alagbata rẹ. Tọju iwe-ẹri rira rẹ fun awọn ẹtọ atilẹyin ọja.


