Ọja Pariview
The visiPower GS-107-G is a comprehensive home security system designed for ease of use and robust protection. It features a 4.3-inch TFT full-color touch screen, supporting both GSM/4G cellular and 2.4GHz WiFi networks for reliable communication. The system is expandable with up to 100 wireless accessories, including PIR motion sensors, door/window sensors, remote controls, and RFID tags. It integrates with Tuya and Smart Life apps for remote control and notifications.

Image: Main alarm panel, solar siren, PIR motion sensors, door sensors, remote controllers, and RFID tags included in the GS-107-G kit.
Eto ati fifi sori
1. Unpacking ati Ibẹrẹ Ayewo
Carefully unpack all components from the box. Verify that all items listed in the package contents are present and undamaged. The standard package includes: 1 x Alarm Panel, 3 x PIR Motion Sensor, 3 x Door Sensor, 2 x Remote Controller, 2 x RFID Tag, 1 x GS520 (Solar Siren).
2. Alarm Panel Installation
The alarm panel is the central hub of your security system. It features a 4.3-inch IPS touch screen for intuitive operation.
- Iṣagbesori: Fix the alarm host to a wall using the provided screws. Choose a central location within your home for optimal wireless signal coverage.
- Asopọ agbara: Connect the alarm host to a power source using the DC 5V micro USB standard interface power supply. The built-in 3.7V/500mAh lithium-ion battery serves as a backup, providing approximately 8 hours of operation during power outages.
- SIM Card Insertion (Optional for GSM/4G functionality): If you intend to use the GSM/4G features for SMS and voice calls, insert a compatible 2G/3G/4G SIM card into the designated slot on the alarm panel. Ensure the SIM card is active and has sufficient credit/data.

Aworan: Iwaju view of the alarm panel showing the touch screen and SOS button.

Image: Illustration of the alarm panel's built-in rechargeable battery and anti-disassembly alarm function.
3. Sensor Installation and Pairing
The system supports up to 90 wireless zones for various accessories. Sensors are typically pre-paired with the main panel. If not, refer to the panel's on-screen menu for pairing instructions.
Awọn sensọ išipopada PIR
Passive Infrared (PIR) motion sensors detect movement based on heat changes. Install them in areas where intruders are likely to pass.
- Ibi: Mount PIR sensors at a height of 2.2-2.4 meters (7-8 feet) from the floor. Avoid direct sunlight, heat sources, or areas with strong air currents.
- Ibo: The wide-angle infrared detection has a detection angle of 110° left and right, and a detection distance of 12 meters (39 feet). For curtain infrared detection, the angle is 15° left and right, and the distance is 8 meters (26 feet), typically installed above doors and windows.

Image: Illustration showing optimal placement and detection range of a PIR motion sensor.
Enu / Window Sensosi
These sensors consist of two parts: a main unit and a magnetic strip. They trigger an alarm when the magnetic contact is broken (i.e., a door or window is opened).
- Ibi: Mount one part on the door/window frame and the other on the moving part (door/window) itself. Ensure they are aligned and within 1 cm (0.4 inches) of each other when the door/window is closed.

Aworan: Example of a door magnetic sensor installed on a door frame and door.
Solar Siren (GS520)
The solar siren is an outdoor alarm device that charges via solar power during the day and senses at night. It provides a loud audible alarm and flashing light when triggered.
- Ibi: Install the solar siren outdoors in a location that receives ample direct sunlight throughout the day for optimal charging. Ensure it is within wireless range of the main alarm panel.
- Awọn ẹya: Plug and play, IP65 waterproof, flash and sound alarm, low-battery/power off detection, anti-tampiṣẹ Eri.

Image: Diagram showing the dimensions and key features of the WiFi Solar Multi-functional Siren.
4. App Setup (Tuya / Smart Life)
The system is compatible with the "Tuya" and "Smart Life" mobile applications, allowing remote control and notifications.
- Ṣe igbasilẹ Ohun elo: Download the "Tuya Smart" or "Smart Life" app from your smartphone's app store (available for iPhone and Android).
- Forukọsilẹ/Wọle: Ṣẹda akọọlẹ kan tabi wọle ti o ba ti ni ọkan tẹlẹ.
- Fi ẹrọ kun: Follow the in-app instructions to add your alarm panel. Ensure your alarm panel is connected to a 2.4GHz WiFi network (5GHz WiFi is not supported). The app will guide you through the pairing process, which often involves putting the alarm panel into pairing mode.
- Tunto Eto: Once connected, you can configure alarm settings, add/remove sensors, set up alarm phone numbers, and manage other system parameters directly from the app.
Awọn ilana Iṣiṣẹ
1. Alarm Panel Interface
The 4.3-inch TFT full-color touch screen provides a user-friendly interface to manage your system. The main screen displays live status, date, and time.
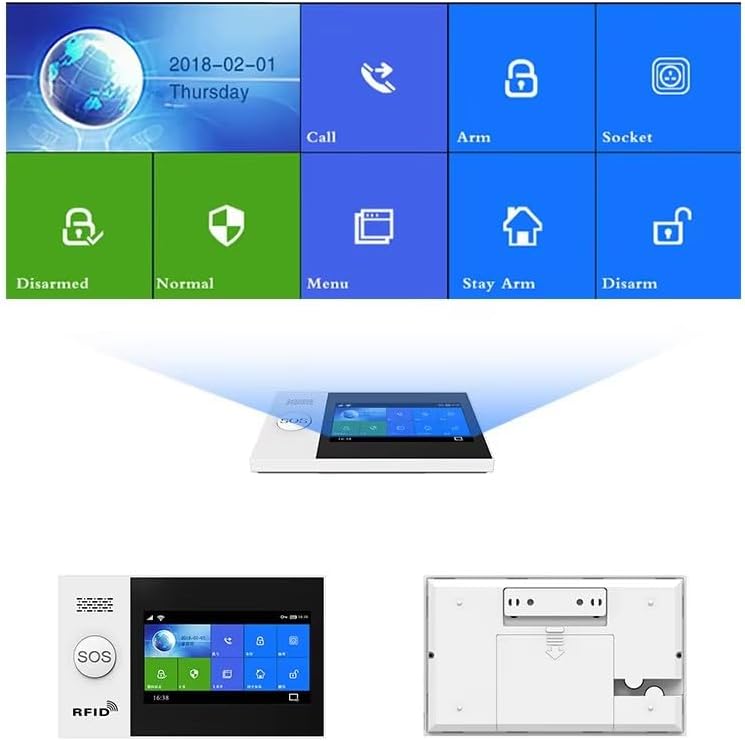
Image: Close-up of the alarm panel's touch screen interface showing various functions like Call, Arm, Disarm, Stay Arm, and Menu.
2. Arming ati Disarming System
- Apa: Activates all sensors. Any triggered sensor will initiate an alarm. Use this when leaving your home.
- Tu silẹ: Deactivates all sensors, allowing free movement without triggering an alarm.
- Stay Arm (Home Arm): Activates perimeter sensors (e.g., door/window sensors) while allowing movement within the home (e.g., motion sensors are bypassed). Use this when you are at home.
- Awọn ọna: You can arm/disarm the system via the touch screen, remote controller, RFID tag, SMS commands, or through the Tuya/Smart Life app.
3. SOS Išė
In an emergency, press the SOS button on the alarm panel or remote controller. The system will immediately trigger an alarm and notify preset emergency contacts via phone call and/or SMS.
4. Two-Way Voice Intercom
The alarm panel supports two-way voice communication. When a SIM card is inserted, you can make and receive calls directly through the panel, or use it for voice messages and remote monitoring.

Image: Illustration of the two-way voice intercom function, allowing communication through the alarm panel.
5. Isakoṣo latọna jijin nipasẹ App
The Tuya/Smart Life app provides full control over your alarm system from anywhere with an internet connection.
- Apá/Gbé: Remotely arm or disarm your system.
- Awọn iwifunni: Receive instant push notifications for alarms and system status changes.
- Eto: Adjust system settings, add/remove devices, and manage user permissions.
- Iṣakoso ohun: The system supports voice control via Amazon Alexa and Google Assistant when integrated through the Tuya/Smart Life app.

Image: Depiction of the alarm system's compatibility with Amazon Alexa for voice control commands.
Image: Screenshot of the mobile application interface for remote control and monitoring of the alarm system.
6. Zone Settings and Customization
The system allows for various zone settings to customize how sensors behave:
- In/Out Zone: Sensors in this zone have an entry/exit delay.
- Indoor Zone: Sensors in this zone are typically bypassed during "Stay Arm" mode.
- Outdoor Zone: Sensors in this zone are active in both "Arm" and "Stay Arm" modes.
- 24 Hours Zone: Sensors in this zone are always active, regardless of arming status (e.g., smoke detectors, gas leak detectors).
- Doorbell Zone: Configures a sensor to act as a doorbell chime.
- Zone Name Editable: You can customize the names of each zone for easier identification.
Itoju
1. Iṣakoso batiri
- Alarm Panel Battery: The main panel has a built-in 3.7V/500mAh lithium-ion backup battery. Ensure the panel is regularly connected to power to keep this battery charged. The system will notify you of low battery status.
- Accessory Batteries: Wireless sensors (PIR, door/window) are battery-powered. The system will provide low battery notifications for these accessories. Replace batteries promptly when indicated to ensure continuous protection.
- Siren oorun: The GS520 solar siren charges automatically during the day. Ensure its solar panel is clean and unobstructed for efficient charging.
2. Ninu
Clean the alarm panel screen and sensor surfaces with a soft, dry, lint-free cloth. Do not use abrasive cleaners or solvents, as they may damage the components.
3. System Updates
Periodically check the Tuya/Smart Life app for any available firmware updates for your alarm panel. Keeping the system updated ensures optimal performance and security.
Laasigbotitusita
| Isoro | Owun to le Fa | Ojutu |
|---|---|---|
| Alarm panel not connecting to WiFi. | Incorrect WiFi password; 5GHz WiFi network; signal interference; router issues. |
|
| Sensors not triggering alarm. | Low battery in sensor; sensor out of range; sensor not paired; incorrect zone setting. |
|
| Àwọn ìkìlọ̀ èké. | Improper sensor placement (PIR); pets; strong air currents; direct sunlight on PIR. |
|
| No SMS/Call notifications. | No SIM card; inactive SIM card; insufficient credit; incorrect phone numbers configured. |
|
Awọn pato ọja
| Paramita | Ẹ̀kúnrẹ́rẹ́ |
|---|---|
| Nọmba awoṣe | GS-107-G |
| Agbara Input | DC 5V (micro USB standard interface) |
| Ṣiṣẹ Lọwọlọwọ | <120mA |
| Imurasilẹ Lọwọlọwọ | <80uA |
| Itaniji Lọwọlọwọ | <500mA |
| Alailowaya Igbohunsafẹfẹ | 433MHZ |
| Ifaminsi Alailowaya | EV 1527 |
| Awọn ẹgbẹ 2G | 850/900/1800 / 1900MHZ |
| Awọn ẹgbẹ Wi-Fi | IEEE802.11b/g/n RF standard (2.4GHz only) |
| Batiri imurasilẹ | 3.7V/500mAh lithium-ion (included) |
| Iwọn otutu | 0℃ ~ 55℃ (32°F ~ 131°F) |
| Ibiti ọriniinitutu | <80%RH (Non-condensing) |
| Awọn iwọn (L x W x H) | 6.3 x 3.9 x 0.7 inches (Alarm Panel) |
| Iwọn Nkan | 1.3 iwon |
| Àwọ̀ | Funfun |
| Asopọmọra Technology | Wireless (GSM/4G, WiFi) |
Alaye atilẹyin ọja
Specific warranty details for the visiPower GS-107-G Home Alarm System are typically provided with your purchase documentation or on the manufacturer's official website. Please refer to these resources for comprehensive warranty terms and conditions. Generally, products are covered against manufacturing defects for a specified period from the date of purchase.
Onibara Support
For technical assistance, troubleshooting beyond this manual, or warranty claims, please contact visiPower customer support. You can typically find contact information (phone, email, or support portal) on the visiPower official webojula tabi nipasẹ rẹ ra Syeed.
Awọn orisun Ayelujara: Ṣabẹwo si visiPower Store on Amazon fun afikun alaye ati awọn imudojuiwọn ọja.


