1. Ifihan ati Loriview
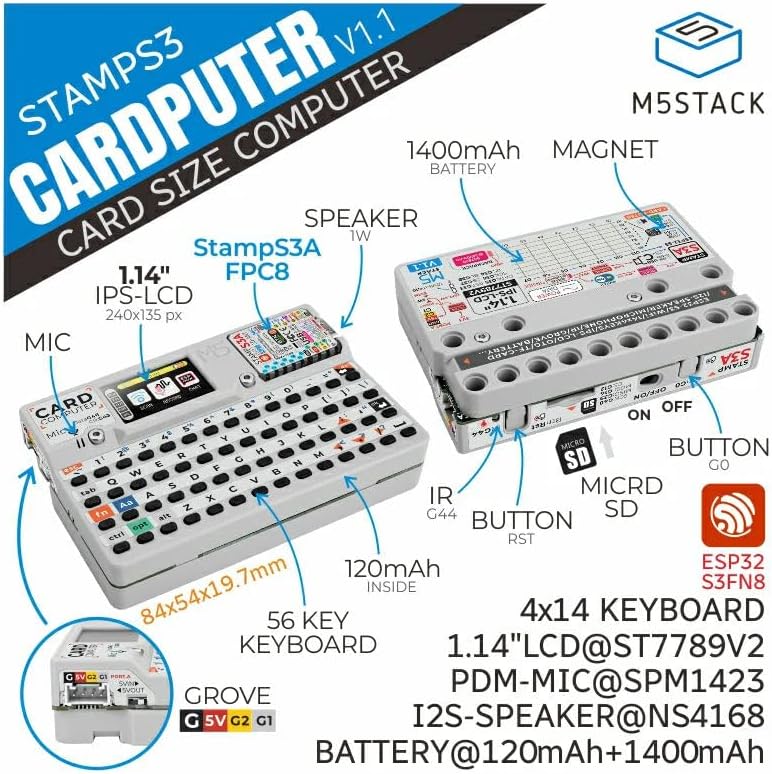
The M5Stack Cardputer v1.1 is a high-performance card computer designed for engineers and enthusiasts. This version is an upgrade from the original Cardputer, incorporating an M5StampS3A microcontroller and optimized core module antenna and keys for enhanced system stability and user experience. It features a 56-key keyboard and a 1.14-inch TFT screen for display and interaction. Audio capabilities include an onboard SPM1423 digital MEMS microphone for recording and wake-up functions, with output via an integrated cavity speaker. An infrared emitter provides external infrared control. For expanded functionality, a built-in Grove interface allows for custom sensor integration, and a Micro SD card slot facilitates storage expansion. The power system combines an internal 120mAh battery with a 1400mAh battery in the base, supported by lithium battery charging and boost/buck circuits for extended battery life. The base is equipped with magnets for metal adhesion and is compatible with LEGO stud expansion. This device is suitable for rapid functional verification, industrial control, home control systems, and various other application scenarios.
2. Awọn ẹya Ọja
- Imudara Iṣe: Features the M5StampS3A microcontroller, improved antenna, and optimized key feel for better user interaction and lower power consumption.
- Igbesi aye batiri ti o gbooro sii: Equipped with a built-in 120mAh battery and an additional 1400mAh battery in the base.
- Integrated Display and Input: Includes a 1.14-inch TFT screen and a 56-key keyboard.
- Connectivity and Expansion: Supports Wi-Fi, Bluetooth, Micro SD card slot, speaker, microphone, and a HY2.0-4P port for I2C sensor expansion.
- Apẹrẹ Onipọ: Base includes magnets for mounting and is compatible with LEGO stud systems.
3. Components and Layout


4. Eto
- Idiyele Ibẹrẹ: Connect the Cardputer v1.1 to a 5V USB power source using the USB-C port. The device contains two lithium batteries (120mAh internal, 1400mAh in base) that require charging before first use.
- Micro SD Card Insertion: If desired, insert a Micro SD card into the designated slot on the side of the device for expanded storage. Ensure the card is inserted correctly until it clicks into place.
- Agbara Tan: Locate the power switch, typically on the side or rear of the device, and slide it to the 'ON' position. The screen should illuminate.
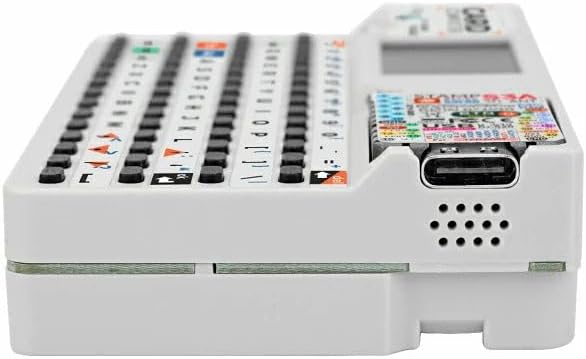
- Firmware/Software: Depending on your application, you may need to connect the Cardputer to a computer via USB-C to upload firmware or development code. Refer to M5Stack's official documentation for specific programming instructions.
5. Awọn ilana Iṣiṣẹ
- Lilo Keyboard: The 56-key keyboard functions like a standard QWERTY layout. Special functions (e.g., 'fn' key combinations) may be available depending on the loaded firmware.
- Screen Interaction: The 1.14-inch TFT screen displays information. Interaction is primarily through the keyboard.
- Gbohungbohun: The integrated SPM1423 digital MEMS microphone supports audio input for recording or voice wake-up features, as enabled by software.
- Agbọrọsọ: Audio output is provided via the integrated cavity speaker.
- Infrared Emitter: The infrared emitter can be programmed to send IR signals for controlling compatible external devices.
- Alupupu Grove: The HY2.0-4P Grove port allows connection of various I2C sensors and modules for expanded functionality. Ensure proper wiring and software configuration for connected peripherals.
- Wi-Fi ati Bluetooth: Utilize the device's wireless capabilities for network connectivity and communication with other Bluetooth-enabled devices, as supported by your application.
6. Itọju
- Ninu: Use a soft, dry cloth to clean the device. Avoid abrasive cleaners or solvents. For the screen, a microfiber cloth is recommended.
- Itọju Batiri: Lati pẹ aye batiri, yago fun gbigba agbara ni kikun ẹrọ nigbagbogbo. Tọju ẹrọ naa ni itura, aye gbigbẹ nigbati o ko ba wa ni lilo fun awọn akoko gigun.
- Ibi ipamọ: Store the Cardputer in a protective environment to prevent dust and physical damage.
- Awọn imudojuiwọn sọfitiwia: Regularly check the M5Stack official website or community forums for firmware updates to ensure optimal performance and access to new features.
7. Laasigbotitusita
- Ẹrọ ti ko ni agbara: Ensure the device is fully charged. Connect it to a reliable 5V USB power source. Check the power switch is in the 'ON' position.
- Iboju ko han: If the device powers on but the screen is blank, try resetting the device using the reset button. Verify that the loaded firmware is compatible and correctly initialized the display.
- Keyboard Ko dahun: Check for any physical obstructions. If using custom firmware, ensure keyboard input is correctly handled by the software.
- Awọn oran Asopọmọra (Wi-Fi/Bluetooth): Verify that the wireless modules are enabled in your software. Check network configurations and ensure the device is within range of the access point or Bluetooth device.
- Kaadi SD Micro Ko Wa: Ensure the Micro SD card is inserted correctly and fully seated. Try formatting the card on a computer if issues persist.
- Ikuna ikojọpọ famuwia: Ensure the correct drivers are installed on your computer. Verify the USB-C cable is functional and securely connected. Use the appropriate M5Stack development environment for uploading.
8. Awọn pato
| Ẹya ara ẹrọ | Ẹ̀kúnrẹ́rẹ́ |
|---|---|
| Awoṣe | K132-V11 Cardputer v1.1 |
| isise | M5StampS3A (ESP32-S3), 240 MHz |
| Àgbo | LPDDR4 |
| Agbara Ibi ipamọ Iranti | 8 MB |
| Eto isesise | FreeRTOS (default) |
| Alailowaya Iru | 802.11bgn (Wi-Fi), Bluetooth |
| Ifihan | 1.14-inch TFT iboju |
| Iṣawọle | 56-bọtini Keyboard |
| Ohun | SPM1423 Digital MEMS Microphone, Integrated Cavity Speaker |
| Awọn ibudo Imugboroosi | Micro SD Card Slot, HY2.0-4P Grove Interface, USB-C |
| Agbara | Internal 120mAh battery, 1400mAh battery in base (Lithium Metal, included) |
| Awọn iwọn | 5.87 x 3.7 x 0.71 inches (Apapọ) |
| Iwọn Nkan | 3.27 iwon |
| Olupese | M5Stack |
9. Atilẹyin ọja ati Support
Warranty information for the M5Stack Cardputer v1.1 is not provided in the product data. For detailed warranty terms, technical support, and additional resources, please refer to the official M5Stack webojula tabi kan si wọn onibara iṣẹ taara.
You can visit the M5Stack Store for more information: M5Stack Official Store


