Ọrọ Iṣaaju
Thank you for choosing the SHIDU 30W Wireless Voice Amplifier M2-U66. This portable voice amplifier is designed to provide clear, powerful sound amplification for various applications, including teaching, presentations, meetings, and outdoor activities. Featuring a wireless lavalier microphone, Bluetooth connectivity, and multiple input options, this device ensures your voice is heard clearly and effortlessly. Please read this manual thoroughly before use to ensure proper operation and to maximize the lifespan of your device.
Package Awọn akoonu
Ṣaaju ki o to bẹrẹ, jọwọ ṣayẹwo awọn akoonu inu package lati rii daju pe gbogbo awọn nkan wa:
- 1 x SHIDU 30W Wireless Voice Amplifier (Main Unit)
- 1 x Gbohungbohun Lavalier Alailowaya
- 1 x Okun Ngba agbara USB-C
- 1 x Okùn èjìká tí a lè ṣàtúnṣe
- 1 x Itọsọna olumulo

Ọja Pariview
Familiarize yourself with the various parts and controls of your SHIDU Voice Amplifier.
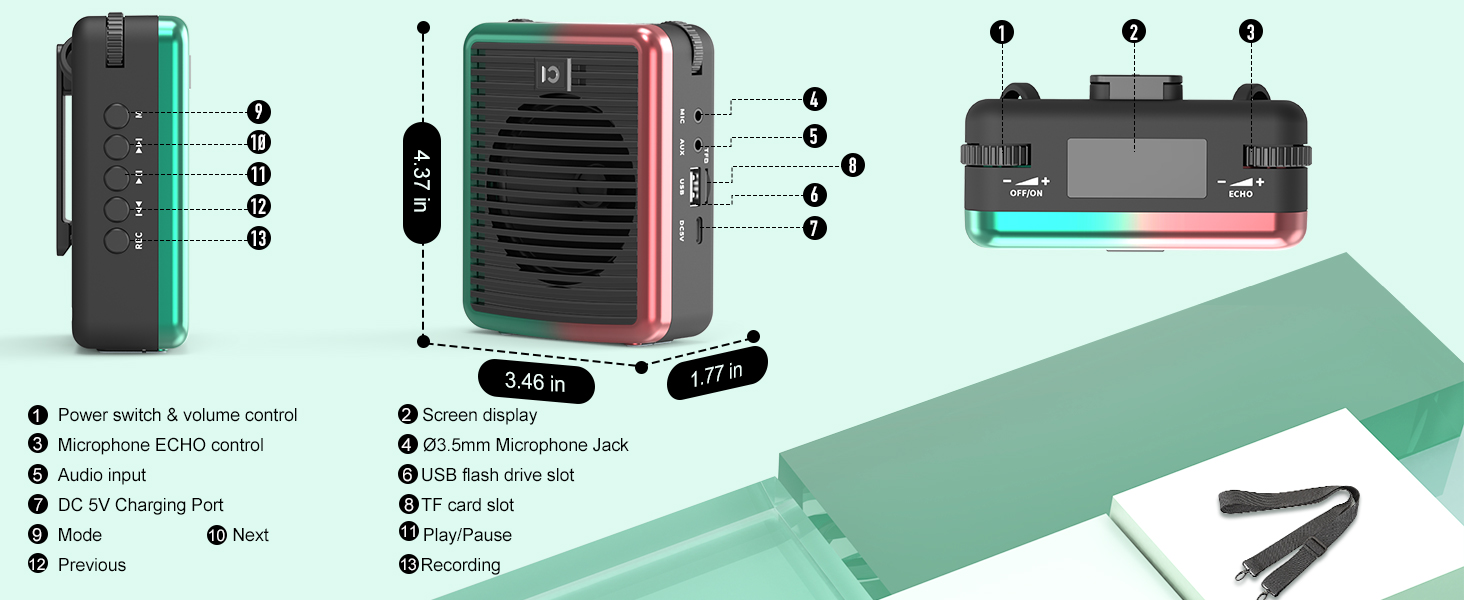
- Yiyipada Agbara & Iṣakoso Iwọn didun: Turn the device on/off and adjust the main volume.
- Ifihan iboju: Shows battery life, mode, and other indicators.
- Microphone ECHO Control: Adjust the echo effect for the microphone.
- Iṣagbewọle Ohun (AUX): 3.5mm jack fun awọn orisun ohun ita.
- Ibudo Ngba agbara DC 5V: Ibudo USB-C fun gbigba agbara amplifier.
- Iho Kaadi TF: Fi kaadi TF (MicroSD) sii fun orin ti a gbọ.
- Iho Flash Drive USB: Fi kọnputa USB sii fun ṣiṣiṣẹsẹhin orin.
- MIC Jack: 3.5mm jack for wired microphone input.
- Bọtini Ipo (M): Short press to switch between modes (Bluetooth, TF, USB, AUX). Long press for microphone pairing.
- Bọ́tìnnì Ṣíṣe/Sánu duro: Mu ṣiṣẹ tabi da idaduro ṣiṣiṣẹsẹhin ohun.
- Ti tẹlẹ/Awọn bọtini orin atẹle: Navigate through audio tracks.
- Bọtini REC: Initiate recording (requires TF card or USB drive).
Ṣeto
1. Ngba agbara ẹrọ
Ṣaaju lilo akọkọ, gba agbara si ohùn mejeeji ni kikun amplifier ati gbohungbohun alailowaya.
- Connect the provided USB-C charging cable to the DC 5V port on the amplifier and a USB power adapter (not included).
- Connect the same USB-C cable to the microphone's charging port.
- Atọka batiri lori amplifier's screen will show charging status. The microphone's LED will indicate charging.
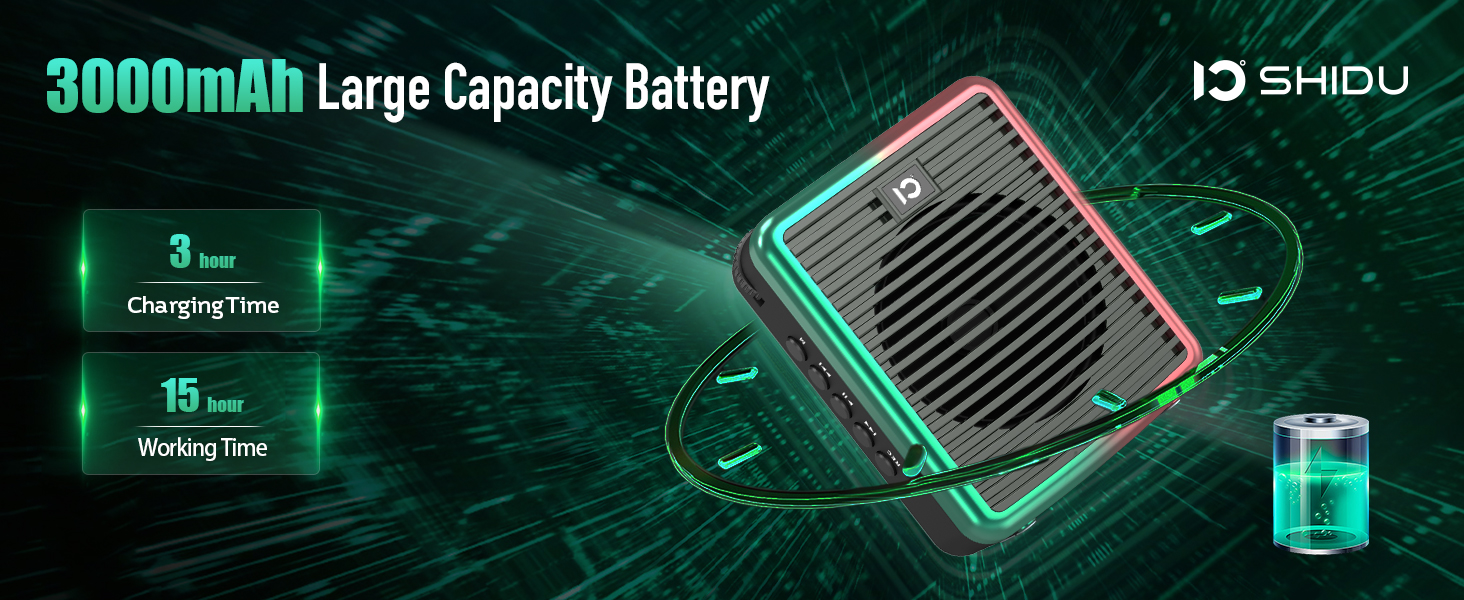
- Charging Time: Approximately 3 hours for the amplifier, 1.5 hours for the microphone.
- Working Time (fully charged): Up to 15 hours for the amplifier, 12 hours for the microphone.
2. Agbara lori / Paa
- Lati agbara lori awọn amplifier: Rotate the Power Switch & Volume Control knob clockwise until the screen lights up.
- Lati fi agbara pa amplifier: Rotate the Power Switch & Volume Control knob counter-clockwise until the screen turns off.
- To power on the microphone: Long press the power button on the microphone until the LED indicator lights up.
- To power off the microphone: Long press the power button on the microphone until the LED indicator turns off.
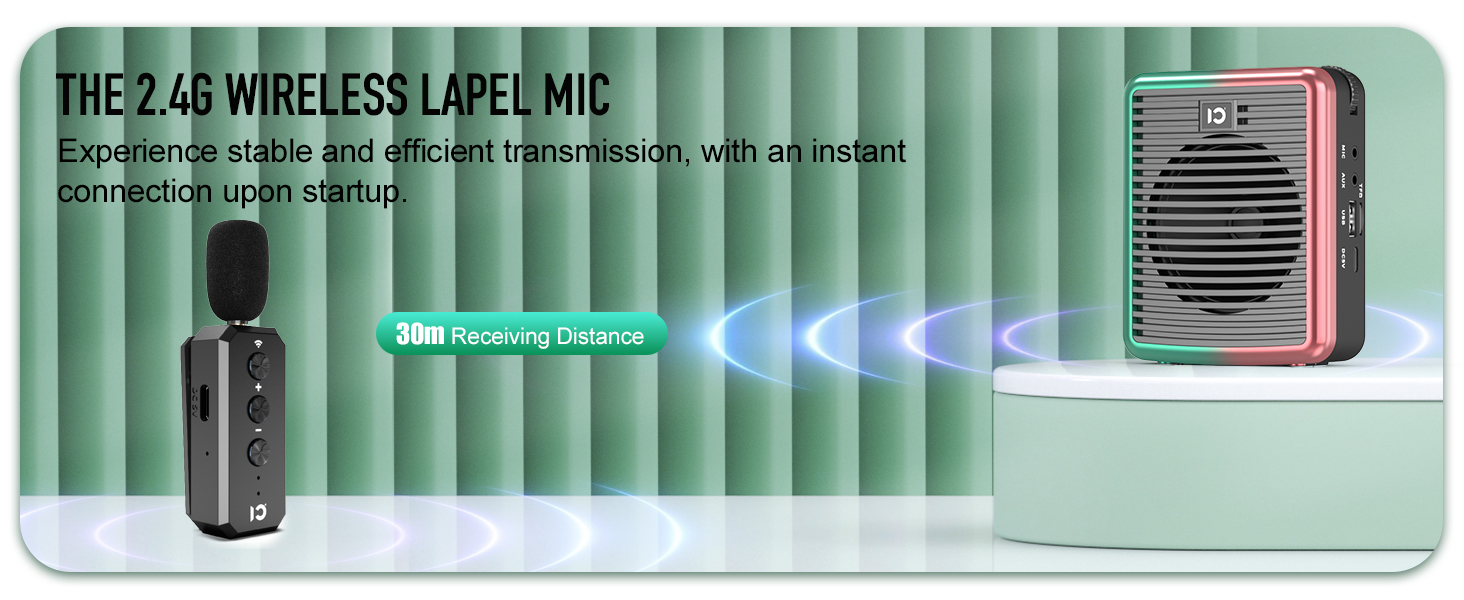
3. Wireless Microphone Pairing
To use the wireless lavalier microphone with the ampolutọpa:
- Rii daju awọn mejeeji amplifier ati gbohungbohun ti wa ni agbara lori.
- Lori awọn amplifier, long press the 'M' (Mode) button until the screen indicates pairing mode.
- On the wireless microphone, long press the wireless button (usually indicated by a Wi-Fi-like icon) at the top.
- The LED lights on both devices will become solid blue once successfully paired.
4. Bluetooth Asopọmọra
To connect your smartphone or other Bluetooth-enabled device for music playback:
- Agbara lori awọn amplifier.
- Short press the 'M' (Mode) button on the amplifier until the screen displays "Bluetooth" or a Bluetooth icon. The icon will flash, indicating it's in pairing mode.
- Lori foonuiyara rẹ, lọ si awọn eto Bluetooth ki o wa awọn ẹrọ to wa.
- Select "M2" (or similar device name) from the list to connect.
- Once connected, the Bluetooth icon on the amplifier's screen will stop flashing.

Awọn ilana Iṣiṣẹ
1. Ohùn Amplification
- Ensure the wireless microphone is paired with the amplifier.
- Sọ kedere sinu gbohungbohun.
- Adjust the main volume using the Power Switch & Volume Control knob on the amplifier.
- Adjust the microphone volume using the +/- buttons on the microphone itself.
- Use the Microphone ECHO Control knob on the amplifier to add or reduce echo effect.

2. Music Playback (TF Card / USB / AUX / Bluetooth)
- Kaadi TF/ Sisisẹsẹhin USB: Insert a TF card or USB flash drive into the respective slot. The amplifier will automatically switch to the corresponding mode and begin playback. Use the Play/Pause, Previous, and Next buttons to control music.
- Sisisẹsẹhin AUX: Connect an external audio device (e.g., MP3 player) to the AUX input using a 3.5mm audio cable (not included). Short press the 'M' button to switch to AUX mode.
- Sisisẹsẹhin Bluetooth: After successful Bluetooth pairing (as described in Setup), play music from your connected device. Use the amplifier's Play/Pause, Previous, and Next buttons, or control directly from your device.
3. Iṣẹ igbasilẹ
To record audio (requires TF card or USB drive inserted):
- Ensure a TF card or USB drive is inserted.
- Tẹ bọtini 'REC' lati bẹrẹ gbigbasilẹ.
- Press 'REC' again to stop recording.
- Awọn igbasilẹ ti wa ni ipamọ si ẹrọ ipamọ ti a fi sii.
4. Wọ awọn Ampitanna
Awọn amplifier is lightweight and designed for portability:
- Attach the adjustable shoulder strap to the clips on the amplifier for hands-free use around your neck or over your shoulder.
- Alternatively, use the clip on the back of the amplifier to attach it to your belt or waistband.

Itoju
- Ninu: Mu ẹrọ naa nu pẹlu asọ ti o gbẹ. Ma ṣe lo abrasive ose tabi epo.
- Ibi ipamọ: Tọju awọn ampìfọ́mọ́ra àti máìkrófóònù ní ibi tí ó tutù tí ó sì gbẹ, tí ó jìnnà sí oòrùn tààrà àti àwọn igbóná tí ó le koko.
- Itọju Batiri: Lati pẹ aye batiri, yago fun gbigba agbara ni kikun ẹrọ nigbagbogbo. Gba agbara rẹ nigbagbogbo, paapaa ti kii ba lo fun awọn akoko gigun.
- Omi Resistance: Ẹ̀rọ náà kì í ṣe omi tí ó lè máa gbóná. Yẹra fún fífi omi sí tàbí ọ̀rinrin tó pọ̀.
Laasigbotitusita
| Isoro | Owun to le Fa | Ojutu |
|---|---|---|
| Ko si ohun lati amplifier. | Device is off, low battery, volume too low, microphone not paired/connected. | Ensure device is on and charged. Increase volume. Re-pair/reconnect microphone. |
| Microphone not pairing. | Microphone off, low battery, incorrect pairing procedure. | Ensure microphone is on and charged. Follow pairing steps carefully (long press 'M' on amplifier, long press wireless button on mic). |
| Distortion/Feedback. | Gbohungbohun sunmo ju amplifier, volume too high, echo too high. | Increase distance between mic and amplifier. Reduce volume. Adjust echo control. |
| Asopọ Bluetooth ko duro. | Ẹ̀rọ náà jìnnà jù sí amplifier, interference. | Ensure connected device is within 30 meters (100 feet) range. Minimize interference from other wireless devices. |
Awọn pato
| Ẹya ara ẹrọ | Ẹ̀kúnrẹ́rẹ́ |
|---|---|
| Nọmba awoṣe | SHIDU-M2-U66 |
| Agbara Ijade | 30 Wattis |
| Agbegbe Agbegbe | Nǹkan bí 21,000 sq.ft (2000 ㎡) |
| Amplifier Batiri | 3000mAh Lithium Ion (up to 15 hours working time) |
| Batiri gbohungbohun | Rechargeable (up to 12 hours working time) |
| Alailowaya Ibiti | Titi de awọn mita 30 (100 ẹsẹ) |
| Asopọmọra | Bluetooth 5.0, TF Card, USB, AUX, MIC |
| Iwọn Nkan | 15.2 iwon |
| Ọja Mefa | 3.66 x 1.89 x 4.37 inches |
Atilẹyin ọja ati Support
Alaye atilẹyin ọja
SHIDU provides a 30-day return and refund policy without reason, along with a 36-month warranty for this product. This warranty covers manufacturing defects and ensures reliable performance.
Onibara Support
For any questions, technical assistance, or warranty claims, please do not hesitate to contact SHIDU customer support. We offer lifetime technical support to ensure your satisfaction.
You can visit the official SHIDU store on Amazon for more information and contact options: SHIDU Store
Official ọja Video
Watch this official product video from SHIDU for a visual guide on the voice ampÀwọn ẹ̀yà ara àti ìlò lifier.


