Ọrọ Iṣaaju
Thank you for choosing the DWVO Two-Tier Small Animal Cage. This manual provides essential information for the safe and correct assembly, operation, and maintenance of your new pet habitat. Please read these instructions thoroughly before beginning assembly and retain them for future reference.
Alaye Aabo
- Always ensure all parts are securely fastened before placing your pet inside the cage.
- Regularly inspect the cage for any damaged or loose components that could pose a hazard to your pet.
- Keep small children and other pets away from the assembly area to prevent accidents.
- This cage is designed for indoor use only.
- Ensure the cage is placed on a stable, level surface.
Package Awọn akoonu
Kí o tó kó gbogbo àwọn ẹ̀yà ara jọ, jọ̀wọ́ rí i dájú pé gbogbo wọn wà níbẹ̀ tí wọn kò sì bàjẹ́. Tí àwọn ẹ̀yà ara kan bá sọnù tàbí tí wọ́n bàjẹ́, jọ̀wọ́ kan sí ìrànlọ́wọ́ àwọn oníbàárà.
- Cage panels (various sizes)
- Platforms (2)
- Ramps (2)
- Slide-out tray (1)
- Wheels (4, 2 with locks)
- Assembly hardware (screws, nuts, connectors)
- Ilana itọnisọna
Eto ati Apejọ
Assembly is generally straightforward, though some users may find it requires careful attention to detail. Follow these steps for proper setup:
- Yọ awọn ohun elo kuro: Carefully remove all parts from the packaging and lay them out on a clean, flat surface. Identify each component using the diagram below.
- Ipejọpọ Ipilẹ fireemu: Connect the bottom cage panels to form the base structure. Ensure all connections are secure.
- So Awọn kẹkẹ: Insert the four 360-degree rotatable wheels into the designated slots on the bottom of the cage frame. Two of the wheels include locking mechanisms for stability.
- Fi sori ẹrọ Awọn paneli ẹgbẹ ati Back: Attach the side and back wire panels to the base frame, ensuring they align correctly.
- Insert Slide-Out Tray: Slide the plastic waste tray into the designated slot at the bottom of the cage. This tray is designed for easy removal and cleaning.
- Install Platforms and Ramps: Position the two platforms at the desired heights within the cage. Attach the non-slip ramps to connect the levels. The ramps are wrapped in nylon for grip and paw protection.
- Attach Front Door Panel: Secure the front door panel, ensuring the unique door lock mechanism is correctly installed and functional. This lock is designed for enhanced security.
- Igbimo Oke Igbimo: Attach the top panel of the cage. The top panel features an openable roof door for easy interaction and cleaning.
- Ṣayẹwo Ipari: Double-check all connections, screws, and latches to ensure the cage is stable and secure for your pet.
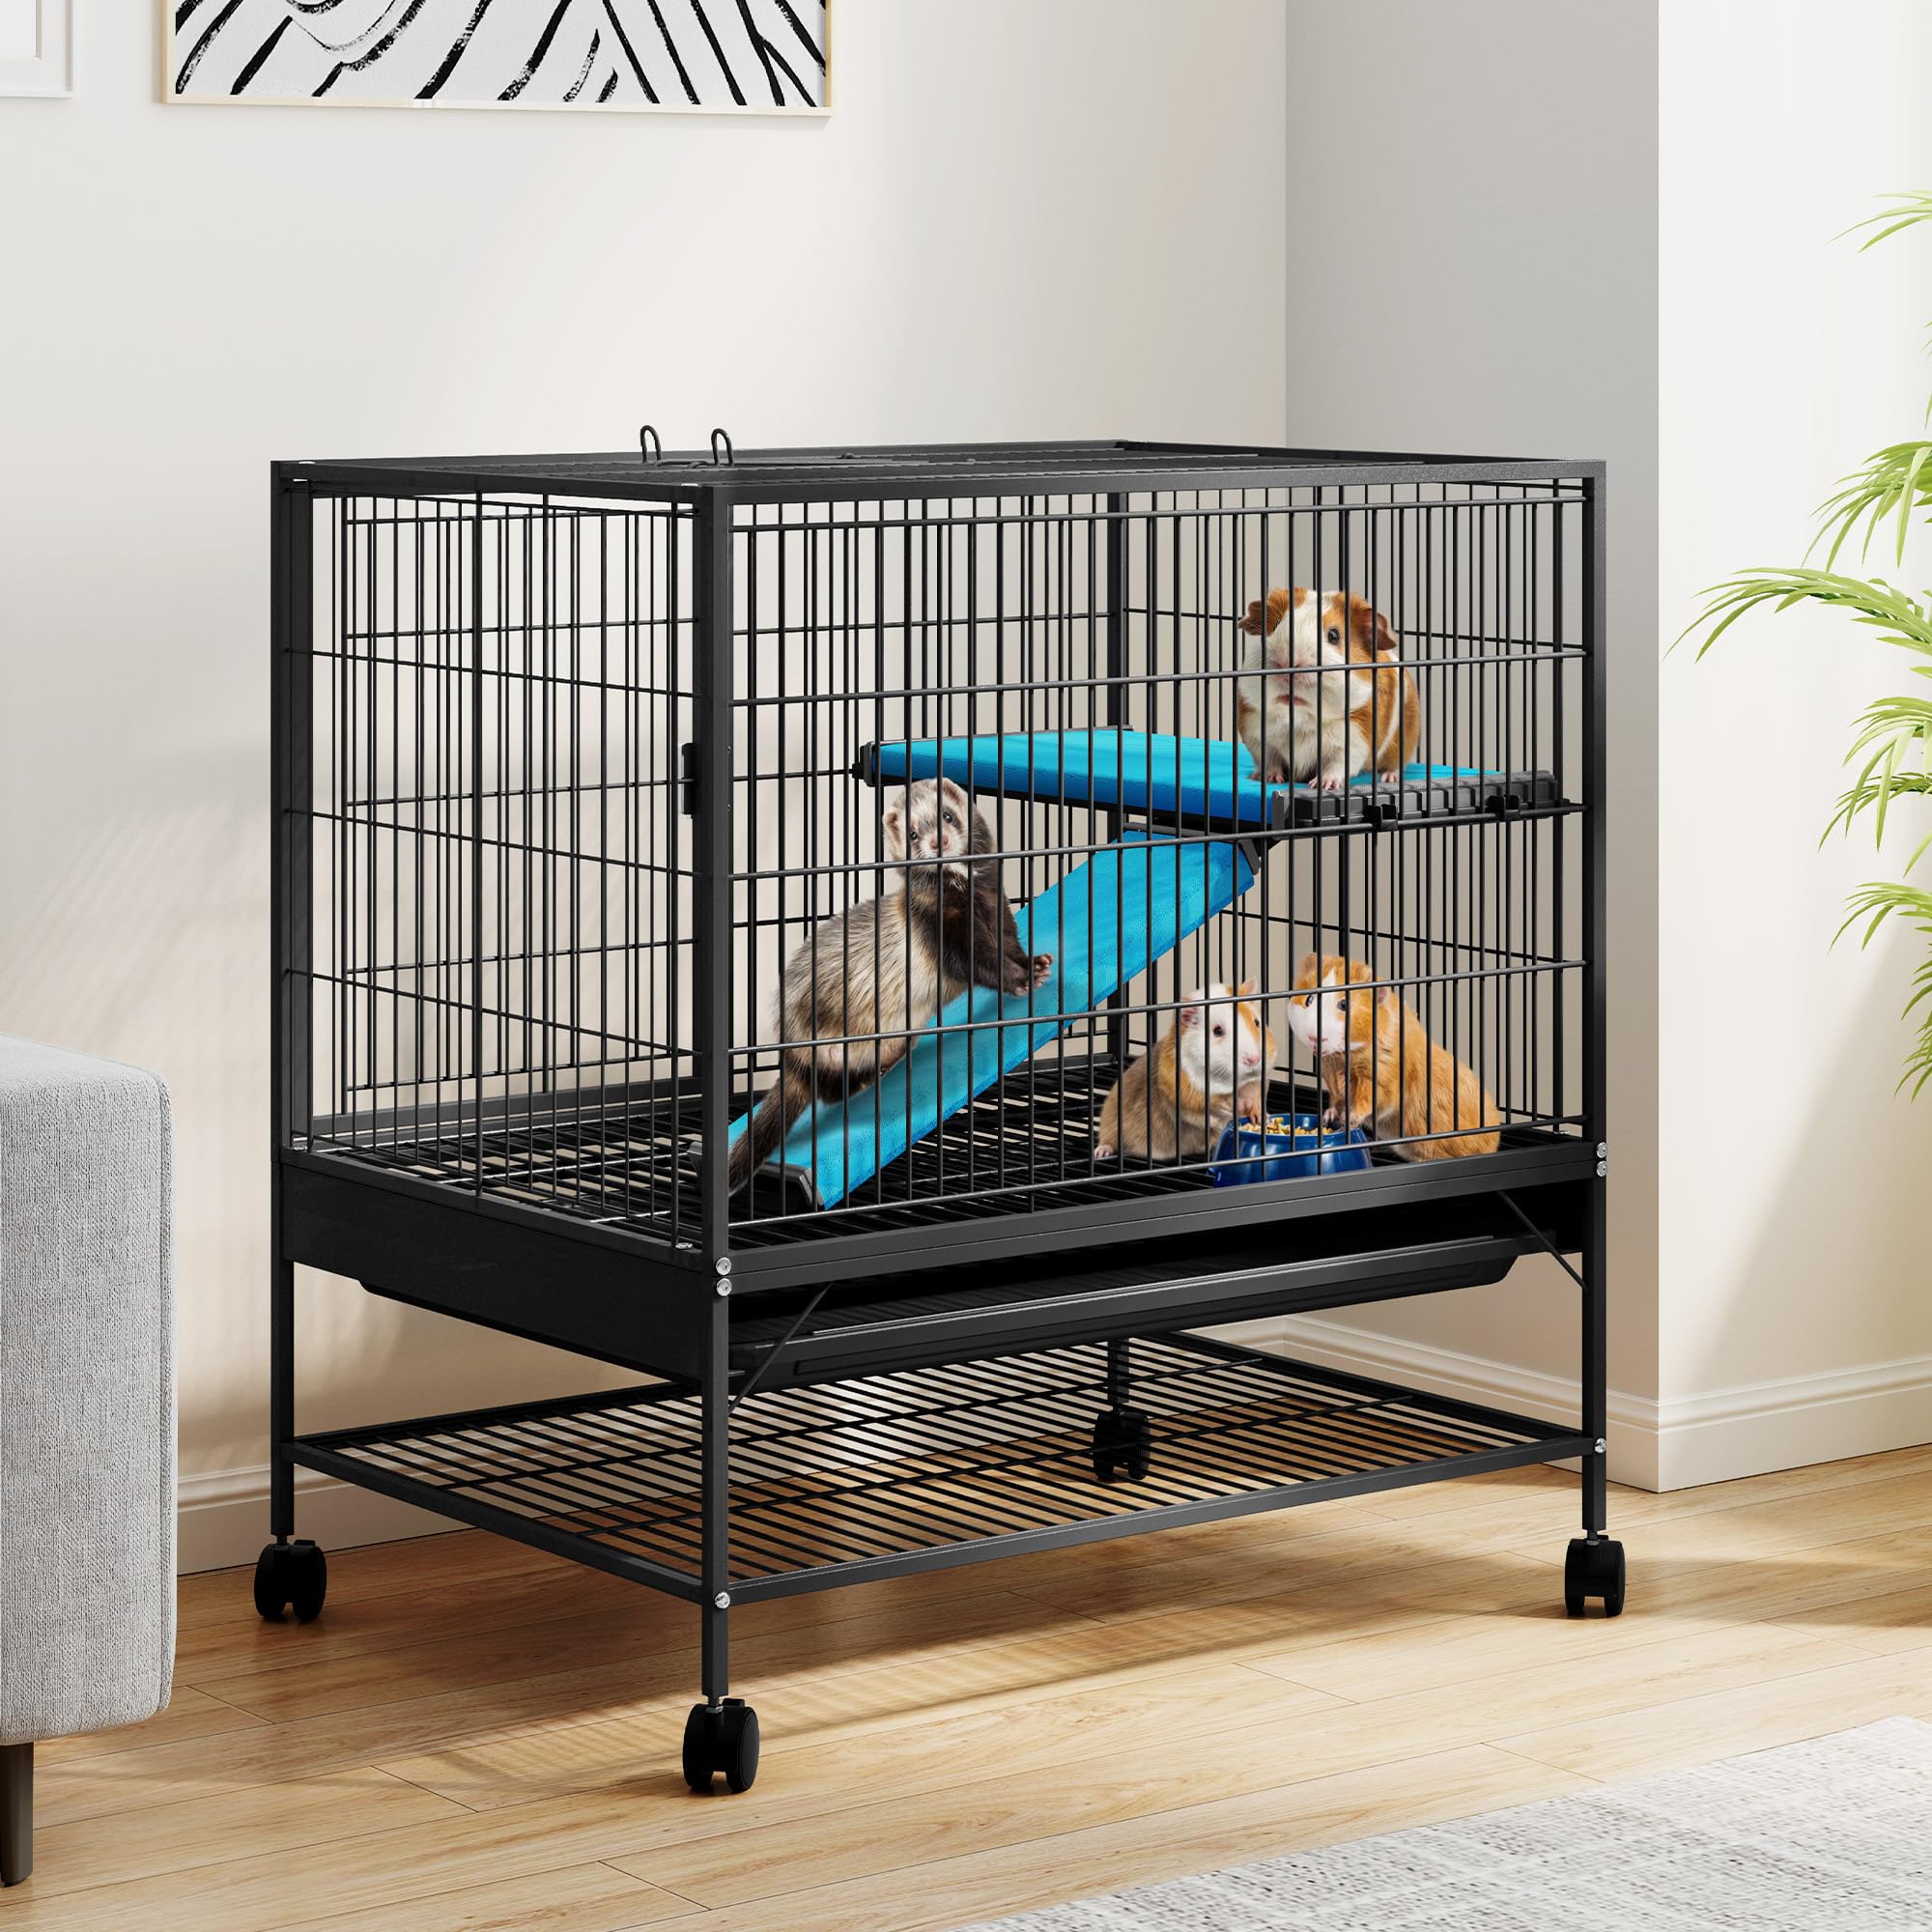
Nọmba 1: Lapapọ view of the DWVO Two-Tier Small Animal Cage with dimensions and component breakdown. The cage measures approximately 32 inches (L) x 22 inches (W) x 33 inches (H). Key features like the slide-out tray, platforms, and wheels are indicated.
Awọn ilana Iṣiṣẹ
This cage is designed for ease of use and pet comfort.
- Accessing the Cage: The main front door provides primary access. Additionally, the top roof door can be opened for easier interaction with your pet or for cleaning.
- Ilana Titiipa aabo: The door features a specially designed lock to prevent intelligent small animals from escaping. Ensure the lock is fully engaged after opening and closing the door.
- Gbigbe: The cage is equipped with four 360-degree rotatable wheels, allowing for easy movement between indoor locations. Use the locking wheels to secure the cage in place when desired.
- Multi-Level Environment: The two platforms and ramps pese ample space for your pet to explore, play, and rest across different levels.

Figure 2: Detail of the secure door lock, designed to keep pets safely inside the cage.

Figure 3: A 360-degree rotatable wheel, highlighting the cage's easy mobility.
Itoju
Regular cleaning and maintenance will ensure a hygienic and safe environment for your pet.
- Ninu ojoojumọ: Remove the slide-out tray daily to dispose of waste and soiled bedding. Wipe the tray with a pet-safe cleaner and dry thoroughly before reinserting.
- Ìmọ́tótó Jíjìnlẹ̀ Ọ̀sọ̀ọ̀sẹ̀: Once a week, remove your pet and all accessories from the cage. Disassemble platforms and ramps if necessary. Clean all cage surfaces, including wire mesh, platforms, and ramps, with a mild, pet-safe disinfectant. Rinse thoroughly and ensure all parts are completely dry before reassembling and returning your pet.
- Isọfọ Atẹ: The slide-out tray simplifies waste removal. Pull the tray out from the bottom of the cage, empty its contents, clean, and slide it back in.
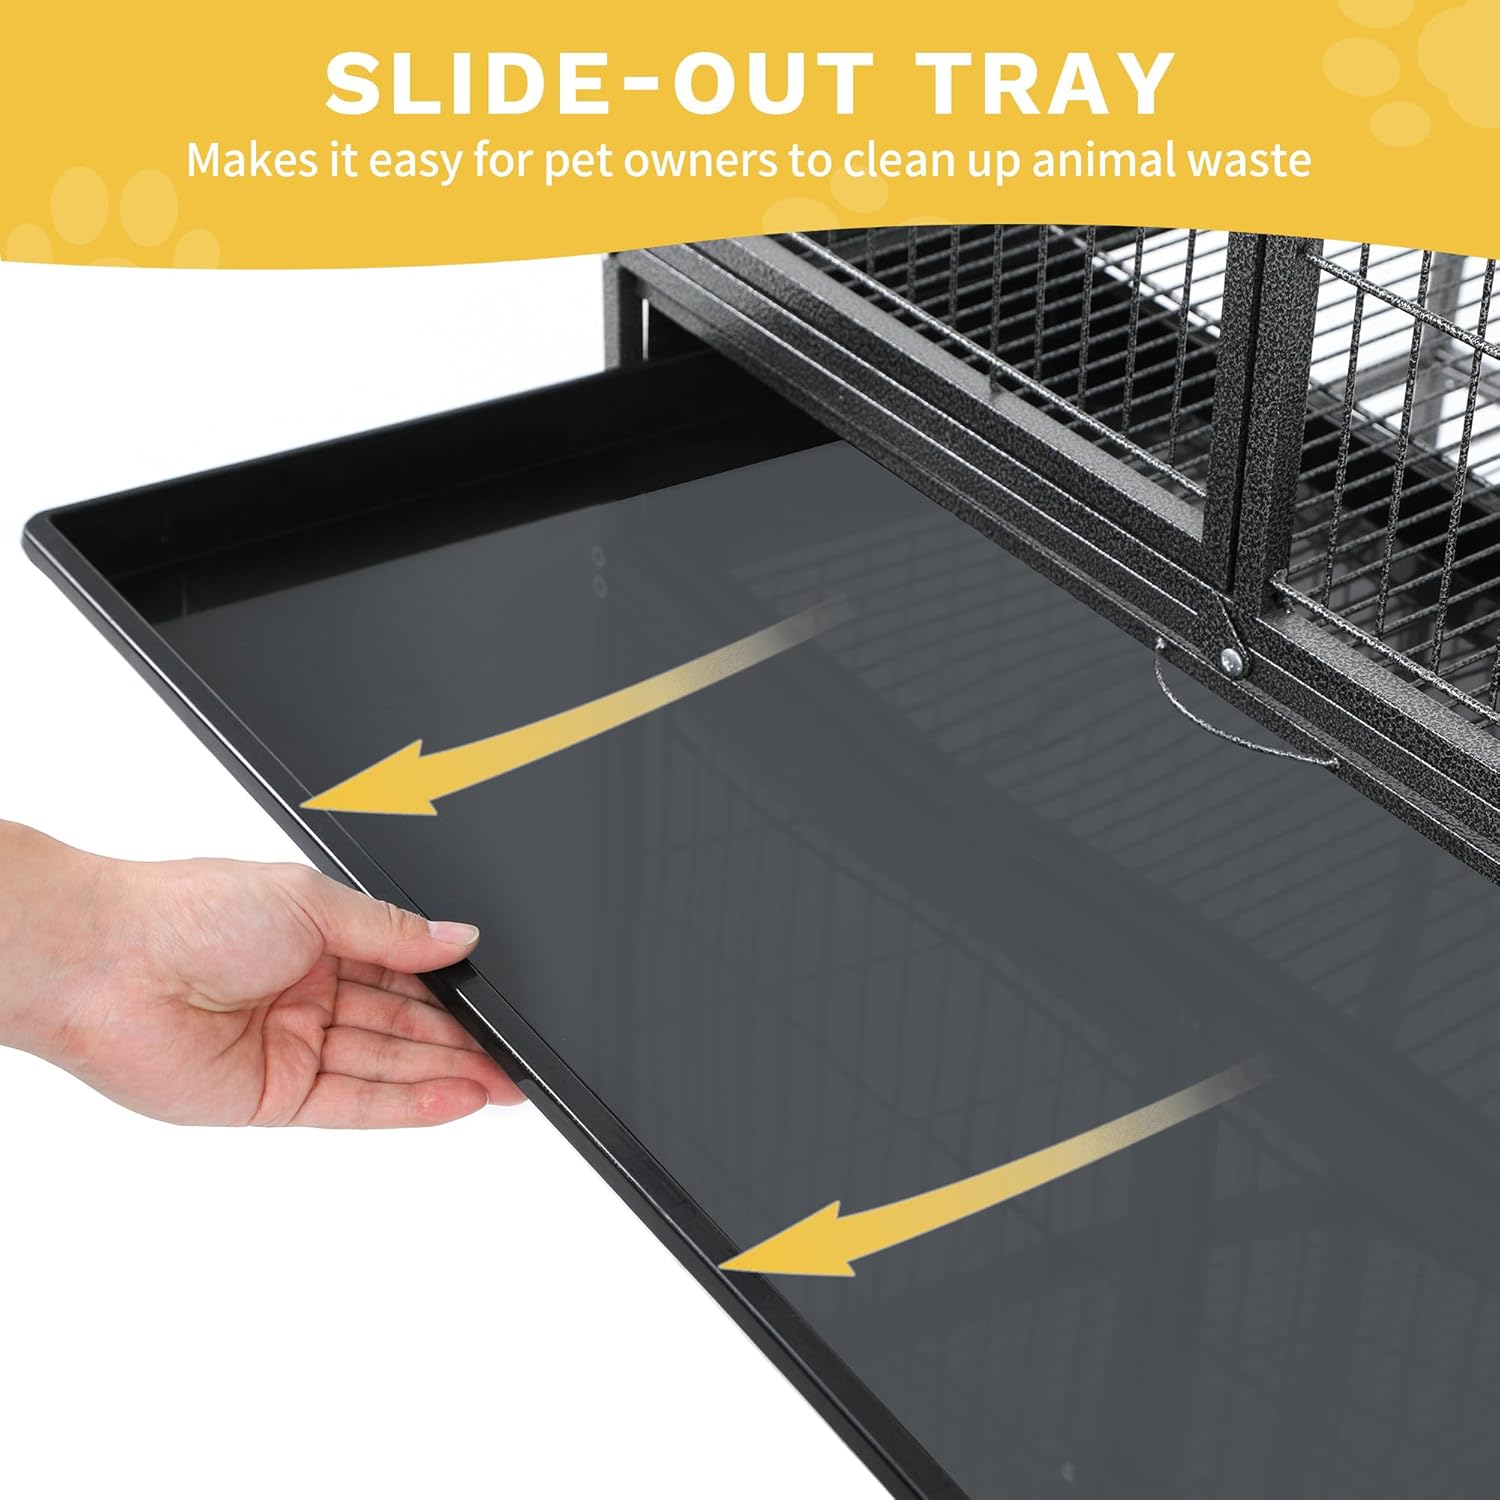
Figure 4: The slide-out tray being removed for easy cleaning of animal waste.
Laasigbotitusita
Ti o ba ni awọn iṣoro eyikeyi, tọka si awọn solusan ti o wọpọ wọnyi:
- Iṣoro lakoko apejọ: Ensure you are following the steps in the correct order and that all panels are oriented as shown in the diagrams. Some connections may require firm pressure. If parts do not align, double-check for incorrect panel placement.
- Ramps being removed by pet: Some intelligent pets may learn to dislodge the ramps. Ensure the ramps are securely hooked onto the platforms. Consider adding additional fasteners if your pet consistently removes them.
- Pet chewing on ramp bo: If your pet chews on the nylon ramp covers, monitor their behavior. If chewing becomes excessive or poses a choking hazard, remove the covers and consider alternative non-toxic ramp surfaces or chew toys to redirect their attention.
- Cage instability: Verify that all screws and connectors are tightened. Ensure the cage is on a flat, even surface and that the locking wheels are engaged if the cage needs to remain stationary.
Awọn pato
| Ọja Mefa | 81.3 cm (L) x 55.9 cm (W) x 83.8 cm (H) (approx. 32"L x 22"W x 33"H) |
| Nọmba Awoṣe Nkan | MADWV9yljR |
| Ohun elo | Plastic (trays, platforms, ramps), Metal (cage wire) |
| Àwọ̀ | Dudu |
| Nọmba ti Awọn ipele | 2 |
| Pataki Ẹya | Easy Assembly, Mobile (with wheels) |
| Awọn Lilo pato | Indoor use for small animals (rodents, chinchillas, guinea pigs, hamsters, rabbits, hedgehogs) |
| Iwọn Nkan | 12.1 kg (tó tó 26.68 poun) |
Atilẹyin ọja ati Support
For warranty information, missing parts, or technical support, please contact DWVO customer service through your retailer or the official DWVO website. Please have your model number (MADWV9yljR) and purchase date available when contacting support.


