1. Ifihan
Thank you for choosing the Godox IT32 iFlash Camera Flash and X5C TTL Wireless Flash Trigger. This compact and versatile flash system is designed to enhance your photography with flexible on-camera and off-camera lighting solutions, especially for Canon cameras. This manual provides detailed instructions for setup, operation, and maintenance to ensure optimal performance.
2. Ọja Ipariview
The Godox IT32 is a powerful and portable camera flash that integrates seamlessly with the X5C TTL Wireless Flash Trigger. Its innovative design allows for quick transitions between on-camera and off-camera setups.
Awọn eroja pataki:
- IT32 Flash Unit: The main flash unit with a rotatable head, LED modeling light, and touchscreen interface.
- X5C TTL Wireless Flash Trigger: A detachable hot shoe trigger that enables wireless control and communication with the IT32 and other Godox X System flashes.
- Iṣagbesori oofa: Allows for quick and secure attachment/detachment of the IT32 from the X5C trigger.
- Integrated Diffuser and Reflector: Built-in tools for light modification.
- Ngba agbara USB-C: Convenient charging for the high-performance lithium battery.
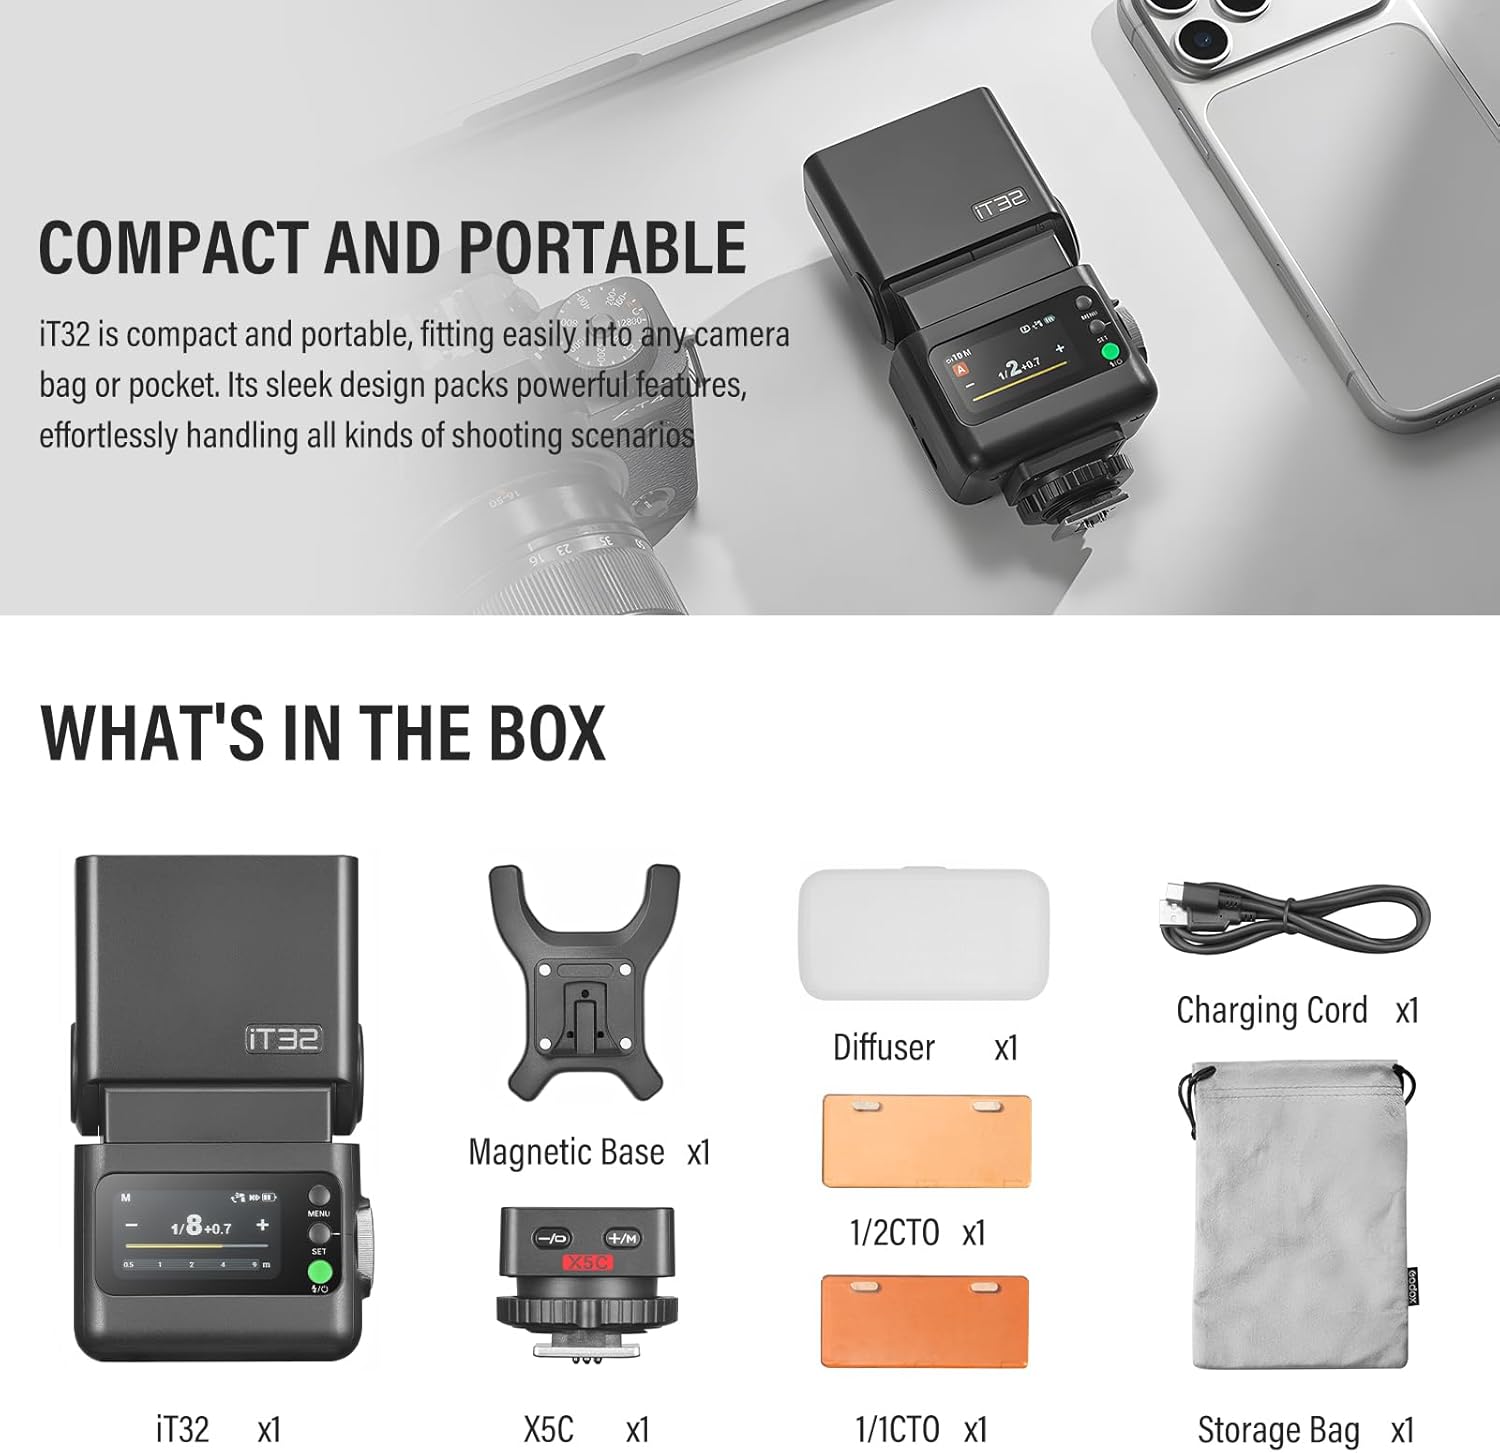
Image: The Godox IT32 iFlash Camera Flash and its included accessories, such as the X5C trigger, diffuser, color filters, charging cord, and storage bag.
3. Eto
3.1 Attaching the X5C Trigger to the Camera
- Slide the X5C TTL Wireless Flash Trigger onto your camera's hot shoe.
- Lock the trigger in place using its locking mechanism.
3.2 Attaching the IT32 Flash Unit
- Align the magnetic base of the IT32 flash unit with the top of the X5C trigger.
- The units will magnetically connect, ensuring a secure attachment.

Image: Demonstrates the magnetic mounting system, showing the IT32 flash unit attaching to the X5C trigger on a camera hot shoe.
3.3 Agbara Lori
Long-press the power button on the IT32 unit until the instruction appears. Swipe the screen or rotate the dial clockwise to power on the device.
Video: A detailed operation tutorial for the Godox IT32 iFlash Camera Flash, covering power-on, touchscreen navigation, and basic settings.
4. Awọn ilana Iṣiṣẹ
4.1 Flash Operation (General)
The IT32 features a color touchscreen and a dial with buttons for intuitive control.
- Afi ika te: Swipe down to open the function menu, swipe up to go back.
- Dial & Buttons: Use the dial to rotate and select options. Press the SET button to confirm. The power/flash button triggers a test flash.
4.2 On-Camera Mode
When the IT32 is mounted on the X5C trigger, it operates in on-camera mode.
- M Mode (Manual): Adjust flash power from 1/1 to 1/256. Tap the "+" or "-" icons for 0.3 increments, slide the bar for rapid changes, or turn the dial for fine-tuning.
- Ipò TTL: Swipe down to switch to TTL mode. Drag the yellow slider to adjust flash exposure compensation.
- Exposure Distance Indicator: Adjust camera settings to display the correct flash distance range on the screen.
4.3 Off-Camera Mode
Separate the IT32 from the X5C to seamlessly switch to off-camera flash mode. The X5C remains on the camera to act as a transmitter.
- Button Control on X5C: Use the "+/M" and "-/D" buttons on the X5C trigger to increase/decrease exposure. Long-press "M" to switch between M and TTL modes. Long-press "-" to check the X5C's battery status (1 flash = low battery, 4 flashes = fully charged).
Video: This video demonstrates the seamless transition between on-camera and off-camera flash modes, highlighting the IT32's detachable design and the X5C trigger's controls.
4.4 Godox 2.4GHz Wireless X System
The IT32 and X5C are part of the Godox 2.4GHz Wireless X System, allowing for versatile multi-flash setups.
- Sender Mode: Swipe down on the IT32 screen to enter Sender mode. Pair with other Godox 2.4GHz wireless flashes.
- Ipo olugba: Syncs wirelessly with XPro / X3 triggers. Tap to sync channel & ID quickly.
- Awọn Eto Alailowaya: Manually set the channel or ID for wireless communication.

Image: Illustrates the effortless multi-light sync capability of the IT32 and X5C within the Godox 2.4GHz Wireless X System, showing how they can trigger multiple flashes simultaneously.
4.5 Other Functions (Menu)
Access additional settings and features by navigating the menu.
- Trigger Dist: Adjust trigger distance (0-30m or 1-100m).
- Sender Flash (Photocell): S1 mode fires in sync with the master's first flash. S2 mode fires in sync with the master's second flash (only available in M mode).
- TCM: Convert TTL metering parameters to M mode.
- Standby / Auto Off / Screen Standby: Configure power-saving and display settings.
- Tolesese Imọlẹ Iboju: Satunṣe imọlẹ ifihan.
- Bootup Settings: Customize startup behavior (e.g., unlock method).
- Èdè: Yan ede ti o fẹ.
- Idapada si Bose wa tele: Mu awọn eto aiyipada pada.
- Alaye ẹrọ: View ẹrọ alaye.
4.6 Modeling Light
The IT32 features a built-in LED modeling light with stepless adjustable brightness. This allows you to preview lighting effects before shooting, provides auxiliary lighting for video, and assists with focusing in low-light conditions.

Image: The IT32's LED modeling lamp in operation, demonstrating its adjustable brightness for previewing lighting effects and assisting in low-light focusing.
4.7 Sync Mode
The IT32 supports various sync modes for creative control:
- Front-curtain Sync: Standard flash synchronization.
- High-speed Sync (HSS): Allows flash synchronization at shutter speeds faster than the camera's native sync speed.
- Rear-curtain Sync: Flash fires just before the second curtain closes, creating motion trails behind the subject.
4.8 Flash Mode
The IT32 offers multiple flash modes:
- M (Afowoyi): Manually set flash power.
- TTL (Lẹ́ńsì-Lẹ́ńsì): Automatic flash exposure based on camera metering.
- Multi (Stroboscopic Flash): Fires a series of rapid flashes during a single exposure to capture multiple movements of a subject. Adjust the number of flashes and frequency.
4.9 Magnetic Accessories
The IT32's magnetic head allows for instant attachment of various light modifiers.
- Reflector & Diffuser: The built-in reflector and wide-angle diffuser can be pulled out to soften light and broaden flash output.
- Color Filters (MA02): Magnetic color filters can be attached to achieve different creative lighting effects.

Image: The IT32 flash unit demonstrating the use of its built-in reflective board and wide-angle diffuser for soft, even lighting in portrait photography.
4.10 Iru-C Ngba agbara
The IT32 incorporates a high-performance lithium battery with a USB-C port for efficient charging. The X5C trigger also has its own battery, and its status can be checked via the IT32 unit.
5. Itọju
- Keep the flash unit and trigger dry. Do not handle with wet hands.
- Nu ẹrọ naa pẹlu asọ ti o tutu, ti o gbẹ. Yago fun lilo awọn kẹmika lile tabi awọn ohun elo abrasive.
- Tọju ẹrọ naa ni itura, aye gbigbẹ kuro lati orun taara ati awọn iwọn otutu to gaju.
- Regularly check the battery and charging port for any signs of damage.
6. Laasigbotitusita
- Filaṣi ko ta: Ensure the unit is powered on, battery is charged, and it's securely mounted or properly synced in wireless mode. Check camera flash settings.
- Ifihan ti ko tọ: Adjust flash power in M mode or exposure compensation in TTL mode. Verify camera ISO, aperture, and shutter speed settings.
- Awọn iṣoro amuṣiṣẹpọ alailowaya: Confirm that the IT32 and X5C (or other triggers) are on the same channel and ID. Ensure no obstructions are blocking the wireless signal.
- Iboju ko dahun: Try restarting the device. If the issue persists, perform a factory reset.
7. Awọn pato
| Ẹya ara ẹrọ | Apejuwe |
|---|---|
| Brand | GODOX |
| Awọn Oke Ibamu | Compatible with Canon 80D, 90D, 7D, 6D, 70D, 750D, 760D, 5DMarkIV, EOS 1DX, 6DMarkII, 77D, 800D, 5DMarkIII, 5DMarkII, 60D, 7D MarkII, 600D, 50D, 30D, 40D, 500D, M5, M3, M50, R, RP, M6II, R5, 1500D, 3000D, R7, R6II, R50, R8, R5C, R10, R100, R5II, R3, 200DII and more. |
| Filaṣi kamẹra Iru | Hotshoe |
| Iyara amuṣiṣẹpọ Flash | 1/8000-aaya |
| Awọn irinše to wa | GD-ITCX1349 (IT32 Flash, X5C Trigger, Diffuser, Magnetic Base, Charging Cord, Color Filters, Storage Bag) |
8. Atilẹyin ọja ati Support
This Godox product is covered by a manufacturer's warranty. For detailed warranty information, please refer to the warranty card included with your product or visit the official Godox website. For technical support, troubleshooting assistance, or service inquiries, please contact Godox customer service through their official channels.


